Java Mail 첨부파일 처리

옛날 sun의 메일 관련 기술 문서인데 썬이 사라지면서 함께 사라졌던 문서. 우연히 인터넷에서 찾게되어 기록용으로 남겨둠.

ADVANCED HTML EMAIL

The April 26, 2004 Tech Tip titled Using the JavaMail API to Send HTML Email, showed how to use the JavaMail API to send HTML email that is also readable by text browsers. But the email from that tip was text only -- it didn't include images. In the following tip, you'll see how to use the JavaMail API to send HTML email that contains embedded images.


Email Image Links Considered Harmful

You might sometimes receive HTML email that includes images. Sometimes the message's HTML code links to the image on the sender's server using an <img> tag, and a src attribute that identifies the image's URL, like this:

   <img src="http://originating_server/images/image.jpg" />

The browser accesses these images just as if it were displaying an image in a Web page. Unfortunately, unscrupulous spammers have used this mechanism as a sneaky way to record who visits their site. They do this by including a unique id in the image src URL, and then saving the ID along with your email address. Such an image URL might look like this:

   <img src="http://evilspammer.com/images/x.jpg?userid=12" />

When you visit the site, the server looks up your email address by the ID, and singles you out for special treatment. Unknowingly, you've just told a spammer that you're considering their product, so they may choose to market to you more aggressively. Worse, you've told them that your email address is "live", so it can be sold at a higher price to yet other spammers.

To protect your privacy, many Web-based (and other) email clients don't display images in HTML emails. While blocking image URLs in emails protects your privacy as a user, it can complicate your life as an application developer. Fortunately, you have another option: embedded images.


Embedding Images in HTML Emails

An alternative to placing absolute URLs to images in your HTML is to include the images as attachments to the email. You then use relative URLs to those images in your HTML code. The email format for attachments is defined by MIME (Multipurpose Internet Email Extensions), the standard protocol specifications for Internet email.

MIME has a mechanism that can be used to send an email containing HTML, plus attachments that contain the images the HTML references. A specification called RFC 2387 defines the MIME content type "multipart/related". A message in multipart/related format contains a collection of objects that are meant to be used together. For the purposes of this tip, that means an HTML file and the images it uses.

Each attachment in a multipart/related message has a unique identifier called its content-id. The content-id is defined by the application that sends the email, and is assigned when the message is constructed. The HTML can reference the image in an attachment by using the protocol prefix cid: plus the content-id of the attachment. For example, if an attachment has content-idimage.part.1@x.org, then an HTML file in the same message could use the image inline with the following tag:

  <img src="cid:image.part.1@x.org" />

A mail reading program (either a standalone program, or a web-based email interface) would render the tag above using the image with the given content-id.


Providing a Text Alternative

As described in the April 2004 tip, you can use a multipart/alternative content type to include alternative versions of the same object. In doing this, you allow the receiving program (the mail reader) to choose the most appropriate content type. The "most appropriate" content type may be defined by the capabilities of the mail reader or by user preferences.

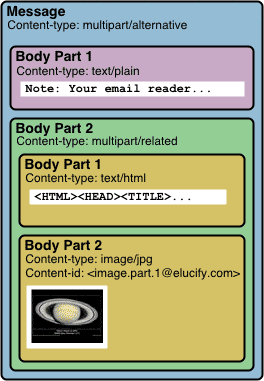
The sample code that accompanies this tip includes both a text version of the transmitted file and an HTML version with embedded images. The content-type of the message itself ismultipart/alternative. The message's first body part is the text alternative. The second body part is the HTML alternative. Images are included in the second part (the HTML) by defining the second part's content-type as multipart/related. The first related body part is the HTML code (text/html), and subsequent body parts are attachments containing any images (image/jpg) used by the first (HTML) related body part.

Here is a diagram of the multipart message sent by the sample code.
사용자 삽입 이미지


JavaMail Sample Code

The class that sends the email, HtmlEmailer.java, uses the JavaMail API to send an email with the structure defined above. The program takes a single argument: the name of a properties file that configures the program's behavior. The first section of the code loads the properties file and uses its values to create and initialize a new MimeMessage.

       Properties props = new Properties();
       props.load(new FileInputStream(propfile));
        
       Session session = Session.getInstance(props, null);
       MimeMessage msg = new MimeMessage(session);
  
       InternetAddress from =
          new InternetAddress((String)props.get
            ("ttjun2004.from"));
    
       InternetAddress to =
          new InternetAddress((String)props.get
            ("ttjun2004.to"));
    
       msg.setFrom(from);
       msg.addRecipient(Message.RecipientType.TO, to);
       msg.setSubject((String)props.get("ttjun2004.subject"));

The next section of the code creates the multipart/alternative section of the message by constructing a MimeMultipart object. It also creates the first alternative body part from the text file name supplied in the props file.

       // Create a "related" Multipart message
       Multipart mp = new MimeMultipart("alternative");

       // Read text file, load it into a BodyPart, 
       // and add it to the message.
       String textfile = (String)props.get("ttjun2004.txtfile");
       BodyPart alt_bp1 = getFileBodyPart(textfile);
       mp.addBodyPart(alt_bp1);

Method getFileBodyPart is simply a convenience method for creating body parts to use as file attachments:

   public BodyPart getFileBodyPart(String filename)
      throws javax.mail.MessagingException {
         BodyPart bp = new MimeBodyPart();
         bp.setDataHandler(new DataHandler
            (new FileDataSource(filename)));
         return bp;
   }

The DataHandler loads the file. The JavaMail classes identify and correctly set the file's Content-type header.

Returning to the class's sendmail method, the next several lines of code create amultipart/related Multipart container, and load it with its first body part: the HTML file contents.

     // Include an HTML version with images. The HTML file
     // is a Multipart of type "related". Inside it are
     // two BodyParts: the HTML file and an image
     String htmlfile = (String)props.get("ttjun2004.htmlfile");
     Multipart html_mp = new MimeMultipart("related");

     // Get the HTML file
     BodyPart rel_bph = getFileBodyPart(htmlfile);
     html_mp.addBodyPart(rel_bph);

The next task is to get the image file. The simple example program allows only a single image file, but more files would be easy to add. The properties file contains the name of the image file to attach, and also defines the content-id. The content-id must match the content-id used by the HTML file. The HTML file can use the same content-id multiple times, but the content-id should be globally unique: no two content-ids should ever be the same.

The code below creates a new MimeBodyPart for the image, and loads it with a FileDataSourcethat acquires the image file contents. The code then initializes several of the image properties. It then adds the image as the second related part of the HTML alternative.

     // Get the image file
     String imagefile = (String)props.get("ttjun2004.imagefile");
     String cid = (String)props.get("ttjun2004.cid");
     MimeBodyPart rel_bpi = new MimeBodyPart();
     FileDataSource ifds = new FileDataSource(imagefile);

     // Initialize and add the image file to the html body part
     rel_bpi.setFileName(ifds.getName());
     rel_bpi.setText("Image 1");
     rel_bpi.setDataHandler(new DataHandler(ifds));
     rel_bpi.setHeader("Content-ID", "<" + cid + ">");
     rel_bpi.setDisposition("inline");
     html_mp.addBodyPart(rel_bpi);

Two of the initializations above merit special attention. First, if the Content-ID header is not set, the image will not be identifiable by the HTML file. In this case, the image will not appear. By convention, the Content-ID is enclosed in angle-brackets. Also, a MIME message's content-id must be URL-encoded (using the same encoding as an HTTP GET query string). Second, the call tosetDisposition("inline") configures the image to appear inline in the HTML, rather than separately at the bottom of the message. This is necessary because some mail readers show images inline only when explicitly told to do so.

The final few lines of the sendmail method create a new MimeBodyPart to wrap theMimeMultipart that forms the second alternative in the message. This code adds the second alternative to the main message body, adds the main message body to the Message object, and then uses the JavaMail Transport class to send the message.

     // Create the second BodyPart of the multipart/alternative,
     // set its content to the html multipart, and add the
     // second bodypart to the main multipart.
     BodyPart alt_bp2 = new MimeBodyPart();
     alt_bp2.setContent(html_mp);
     mp.addBodyPart(alt_bp2);

     // Set the content for the message and transmit
     msg.setContent(mp);
     Transport.send(msg);

The default content (text file, html file, and image) simulates a newsletter that provides a "Space Image of the Day". In this case, the "Space Image of the Day" is a picture of the planet Saturn, accompanied by some text describing the picture. Experiment with this class by defining your own HTML content, and linking and attaching images. Don't forget to change the parameters in the properties file to reflect your changes.


 

2015/09/10 15:22 2015/09/10 15:22
Trackback Address:이 글에는 트랙백을 보낼 수 없습니다

응?

오늘 구글의 새로운 로고가 적용되었습니다.

그런데.. 응?

구글 새 로고

구글 새 파비콘

GS 그룹 로고

GS 그룹 로고


2015/09/02 20:58 2015/09/02 20:58
Trackback Address:이 글에는 트랙백을 보낼 수 없습니다

java 어플리케이션을 windows service 로 등록

http://forge.ow2.org/ 의 JavaService.exe 를 활용한 윈도우즈 서비스로 등록.

tip. -current 옵션으로 어플리케이션 위치 정보를 전달 해야 함.
[code]@echo off
rem *******************************************************
rem * 아래 내용은 사용자 환경에 맞추어 설정하여야 한다.
rem * JAVA_HOME : java설치된 경로
rem * JAVA_SERVICE : JavaService.exe 실행 파일위치
rem * SERVICE_NAME : 서비스 이름
rem * AGENT_PATH : Java 프로그램 경로
rem *******************************************************
set AGENT_PATH=C:/usbbackup
set SERVICE_NAME="USB_Backup"
set JAVA_HOME=%AGENT_PATH%/jre
set JAVA_SERVICE=%AGENT_PATH%/JavaService.exe
set CLASSPATH=%JAVA_HOME%/lib/rt.jar
set CLASSPATH=%AGENT_PATH%/lib/h2-1.3.176.jar
set CLASSPATH=%AGENT_PATH%/lib/log4j-1.2.17.jar;%CLASSPATH%
set CLASSPATH=%AGENT_PATH%/lib/slf4j-api-1.7.12.jar;%CLASSPATH%
set CLASSPATH=%AGENT_PATH%/lib/slf4j-log4j12-1.7.12.jar;%CLASSPATH%
set CLASSPATH=%AGENT_PATH%/USBCopy-1.0.jar;%CLASSPATH%
set CLASSPATH=%AGENT_PATH%/conf;%CLASSPATH%
set CLASSPATH=%AGENT_PATH%/log;%CLASSPATH%

rem *******************************************************
rem * 아래 내용은 수정 하지 마시오.
rem *******************************************************
%JAVA_SERVICE% -install %SERVICE_NAME% %JAVA_HOME%/bin/server/jvm.dll -Djava.class.path=%CLASSPATH% -Xmx32M -start com.usbcopy.AppMain -out %AGENT_PATH%/log/javaservice_out.log -err %AGENT_PATH%/log/javaservice_err.log -current %AGENT_PATH% -description "USB 자동 백업 프로그램"
pause [/code]

[code]@echo off
rem *******************************************************
rem * 아래 내용은 사용자 환경에 맞추어 설정하여야 한다.
rem * JAVA_SERVICE : JavaService.exe 실행 파일위치
rem * SERVICE_NAME : 서비스 이름
rem ******************************************************

set JAVA_SERVICE="C:/usbbackup/JavaService.exe"
set SERVICE_NAME="USB_Backup"

%JAVA_SERVICE% -uninstall %SERVICE_NAME%
pause [/code]
2015/08/19 15:33 2015/08/19 15:33
Trackback Address:이 글에는 트랙백을 보낼 수 없습니다

거짓말이란 말이다.

거짓말이란 말이다,쇼노스케, 이렇게 생겼단다.
낚싯바늘과 비슷하다고 말했다. 땅 파기는 좋아해도 낚시와 거의 연이 없는 사람이면서.
낚싯바늘은 물고기 입에 걸리면 쉽게 빠져나오지 못하게 끝이 구부려져 있거든. 거짓말도 그렇구나. 그렇기에 남을 낚기는 쉽지만 일단 걸리고 나면 좀처럼 빠지지 않는다. 그래도 빼려고 들면 그냥 찔려있을 때보다 더 깊이 남에게 상처를 주고 자신의 마음도 후벼파게 되는것이야.
아버지는 가쓰노스케가 울더라고 가르쳐주었다.
거짓말 갈고리를 빼는 아픔에 울더구나. 그러니 쇼스케야.
아버지는 이어서 말했다.
작은 일, 사소한 일로 거짓말을 해서는 안 된다. 거짓말은 한평생 계속할 각오가 있을 때만 하려무나.
2015/08/13 09:47 2015/08/13 09:47
Trackback Address:이 글에는 트랙백을 보낼 수 없습니다
  1. Blog Icon
    들개

    거짓말은 한평생 계속할 각오가 있을 때만 하려무나.

    맴도네요.

Migrating from Spring Security 3.x to 4.x

WebSocket과 Spring Data, Test를 지원하는 Spring Security 4.0이 출시되었는데요.
기존 3.X 버전에서 4.X 버전으로 마이그레이션에 참고할 수 있는 코드가 github에 있네요.

XML 기반 프로젝트 마이그레이션
https://github.com/spring-projects/spring-security-migrate-3-to-4/compare/xml
코드기반의 프로젝트 마이그레이션
https://github.com/spring-projects/spring-security-migrate-3-to-4/compare/jc
2015/07/21 07:35 2015/07/21 07:35
Trackback Address:이 글에는 트랙백을 보낼 수 없습니다

Jetty 9.3 출시와 HTTP/2 지원

올해로 Jetty 탄생 20주년이되었습니다. 지난 7월12일 Jetty 9.3이 출시되었는데요. 가장 큰 특징은 HTTP/2 를 지원하고 최소 구동 Java 버전이 8이 되었습니다. 9.2.X 버전에 있었던 버그를 400개 이상 fix하고 SPDY를 제거했다고 하네요.
https://dev.eclipse.org/mhonarc/lists/jetty-announce/msg00080.html

Jetty의 리드개발자인 Greg Wikins는 그의 블로그를 통해 Jetty에서의 HTTP/2 에 대해 글을 올렸습니다.(https://webtide.com/introduction-to-http2-in-jetty/)

[code]$ java -jar $JETTY_HOME/start.jar --add-to-startd=http2,http2c[/code]
와 같은 형식으로 HTTP/2 를 활성화 할 수 있으며, HTTP/2 를 지원하기 위해 새로운 커넥터를 생성하거나 포트를 할당하는 방식이 아닌 기존 커넥터의 HTTP/2 지원을 활성화 하는 방식이라고 합니다.

2015/07/21 07:23 2015/07/21 07:23
Trackback Address:이 글에는 트랙백을 보낼 수 없습니다

Java8 Stream API와 Lambda

타니모토 신 (  谷本 心 , @cero_t  ) 님이 작성한 자료에서 영감을 받아 Java8 의 Stream API와 Lambda 에 대해 정리해 보았습니다.

2015/06/09 13:54 2015/06/09 13:54
Trackback Address:이 글에는 트랙백을 보낼 수 없습니다

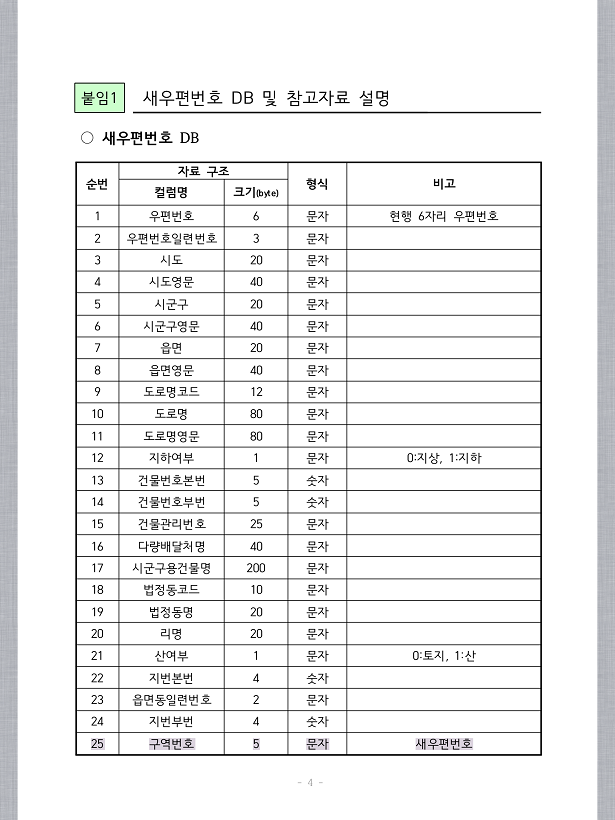
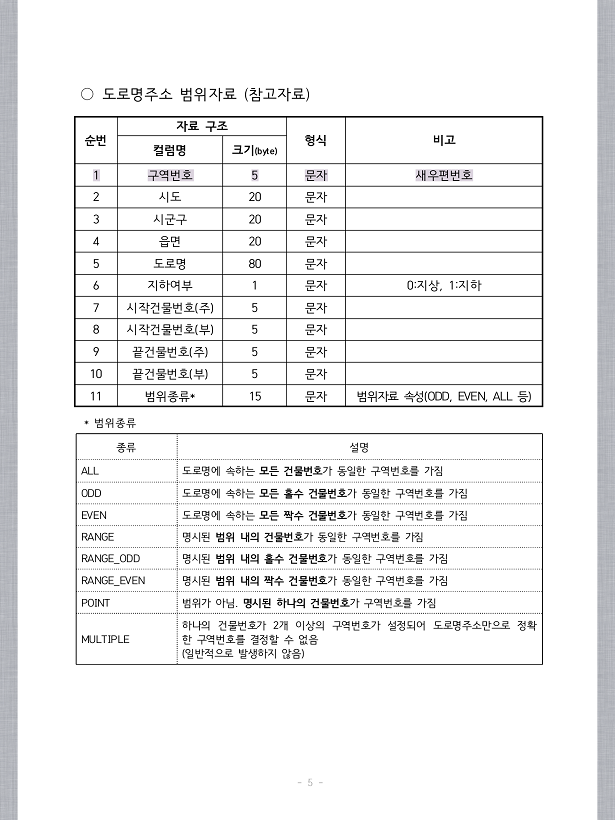
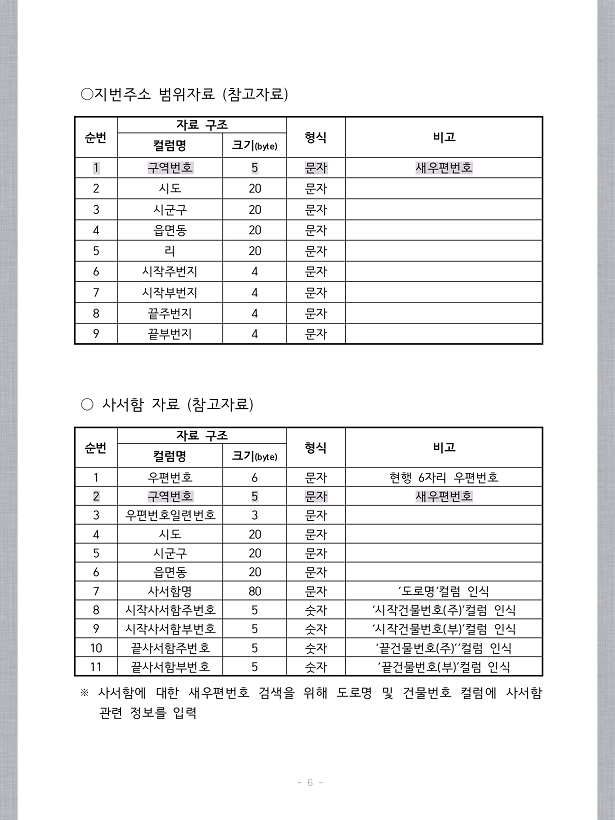
8월 새 우편번호의 필드 속성 정보

올 8월 우편번호 개편이 예정되어 있어 지난 도로명 주소때와 비슷한 혼란이 있을 것 같은 가운데.. 
새 우편번호 안내는 아래 url에서 확인 가능.
http://www.epost.go.kr/search/zipcode/cmzcd003k01.jsp 

문제는 새로운 우편버호 체계를 기존 서비스에 적용해야하는 개발자들이 관심을 가질만한 필드 속성.
무려 25개 필드가 존재...

그냥 포털에서 제공하는 주소 검색기를 쓰는게 편할까..
http://postcode.map.daum.net/guide

출처 : 우정사업본부 http://www.koreapost.go.kr
사용자 삽입 이미지
사용자 삽입 이미지
사용자 삽입 이미지


2015/05/10 12:31 2015/05/10 12:31
Trackback Address:이 글에는 트랙백을 보낼 수 없습니다

$9 짜리 컴퓨터 kickstarter에 등장

2015/05/10 11:44

서비 낙서장 ,

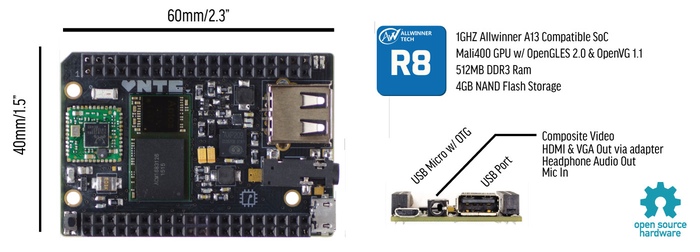
라즈베리파이 보다 더 저렴한 OpenSource 컴퓨터가 킥스타터에 등장했다.
라즈베리파이 보다 저 작은 사이즈,  라즈베리파이 2만큼은 아니지만 B+ 모델보다 강력한 컴퓨팅 파워를 가진 'CHIP'이라는 컴퓨터가 단지 $9.
현재 킥스타터 모금 목표인 $50,000을 훨씬 뛰어넘어 $500,000을 목전에 두고 있어 사람들의 호응을 짐작케한다.  WIFI와 Bluetooth 4.0 가 onchip으로 기본 장착이다.
CHIP도 아두이노처럼 하드웨어 디자인과 PCB 레이아웃이 완전 오픈소스로 공개된다고하니 판매량만 받쳐준다면 호환보드의 등장을 기대할수도 있을 듯.
모금 완료이후에 가격이 어떻게 책정될지는 모르겠지만 설마 $20을 넘기진 않겠지?

사용자 삽입 이미지

관심 있다면 여기를 방문해 보자.
https://www.kickstarter.com/projects/1598272670/chip-the-worlds-first-9-computer
2015/05/10 11:44 2015/05/10 11:44
Trackback Address:이 글에는 트랙백을 보낼 수 없습니다

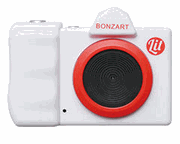
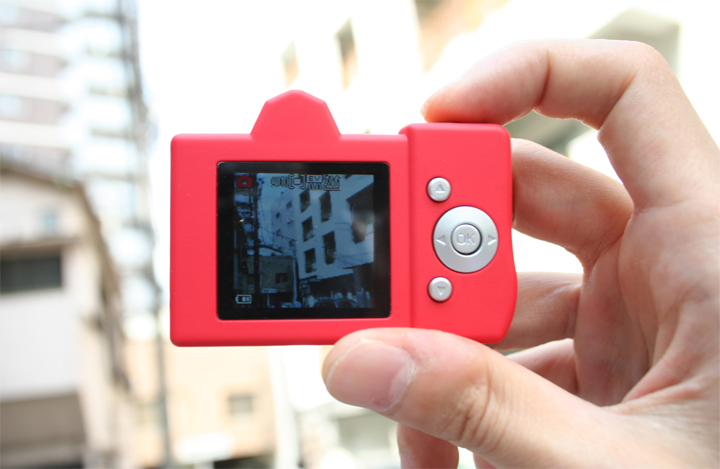
사고 싶은 것. BONZART Lit

사용자 삽입 이미지

단돈 $40짜리 토이 카메라.... 그런데.. 찾는곳마다 품절....
http://global.rakuten.com/ko/store/bonz/item/377-00003/
http://www.amazon.co.uk/BONZART-Lit-Red-GDC-LIT-japan/dp/B009K1VA4A
http://www.ultrafineonline.com/bolitdicawh.html
http://item.rakuten.co.jp/bonz/377-00003/

그나마 여기서 구할순 있는데.. 배송비 제하고 무려 $99에 팔고 있음..
http://www.amazon.com/Bonzart-LIT-Digital-Camera-Black/dp/B009K1YXHG

사용자 삽입 이미지


사용자 삽입 이미지


2015/05/04 22:42 2015/05/04 22:42
Trackback Address:이 글에는 트랙백을 보낼 수 없습니다

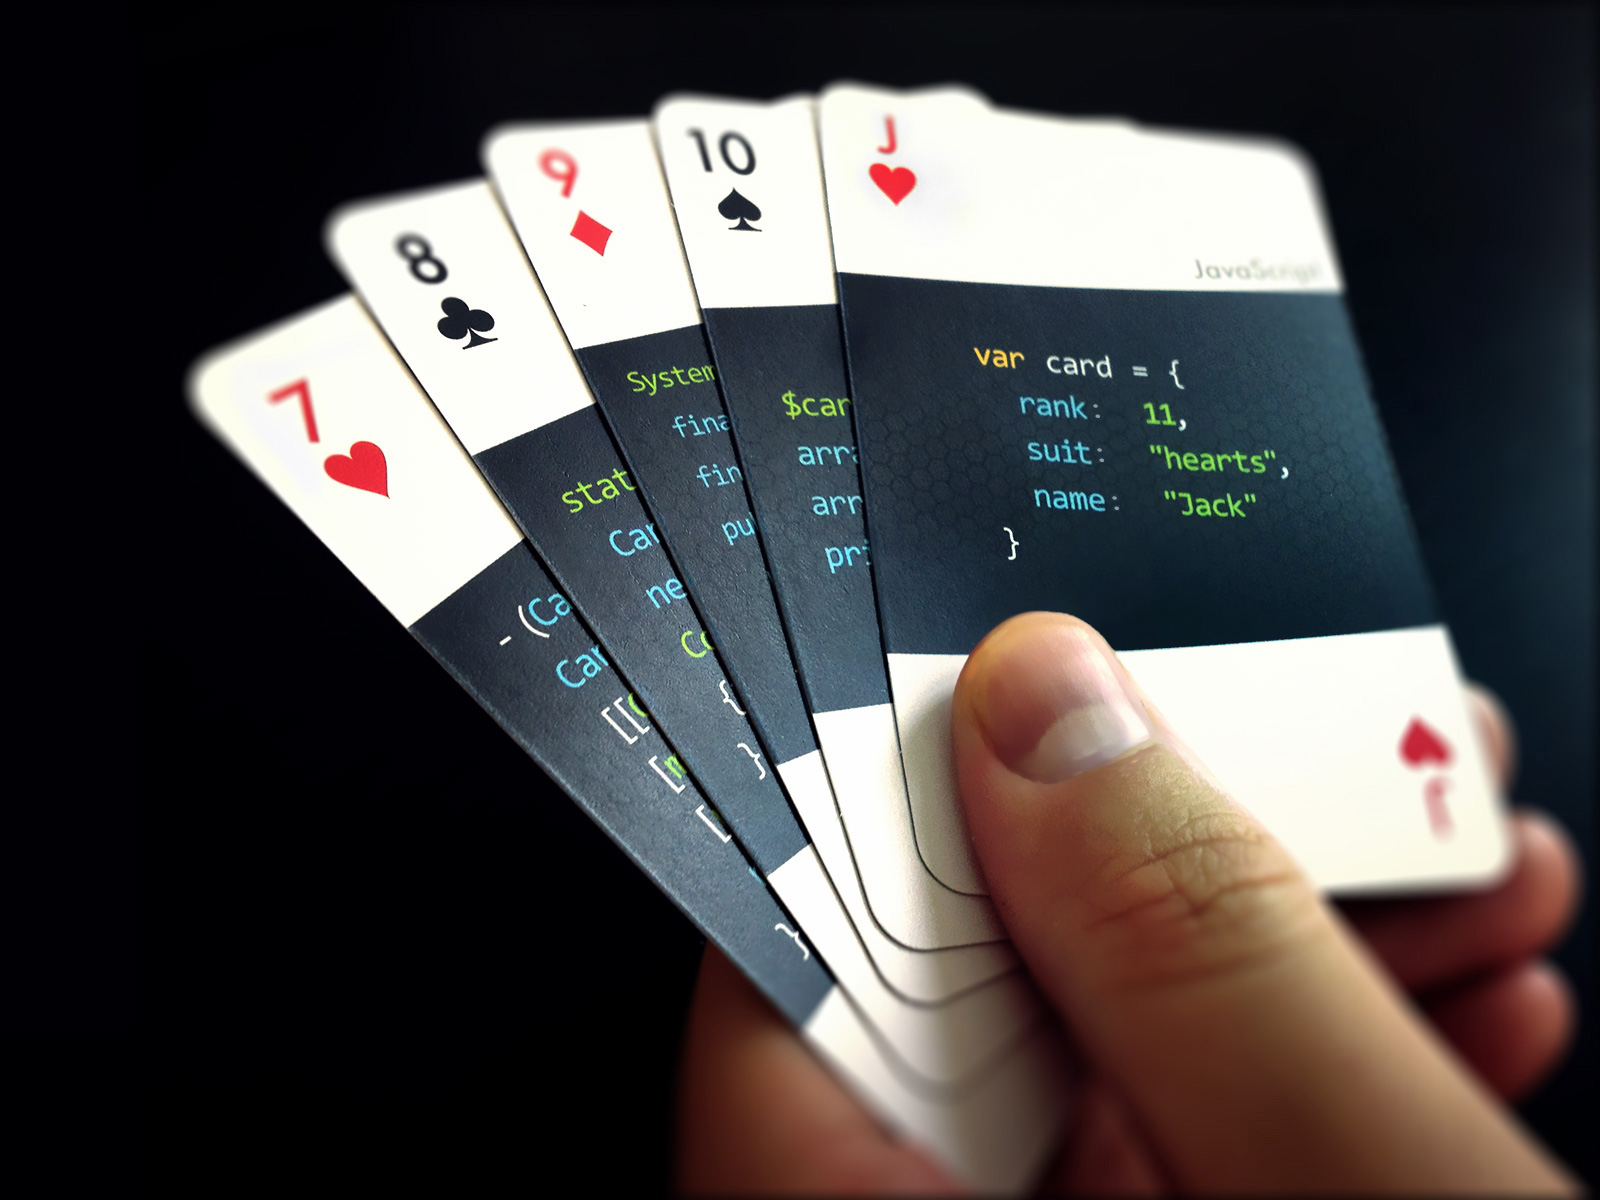
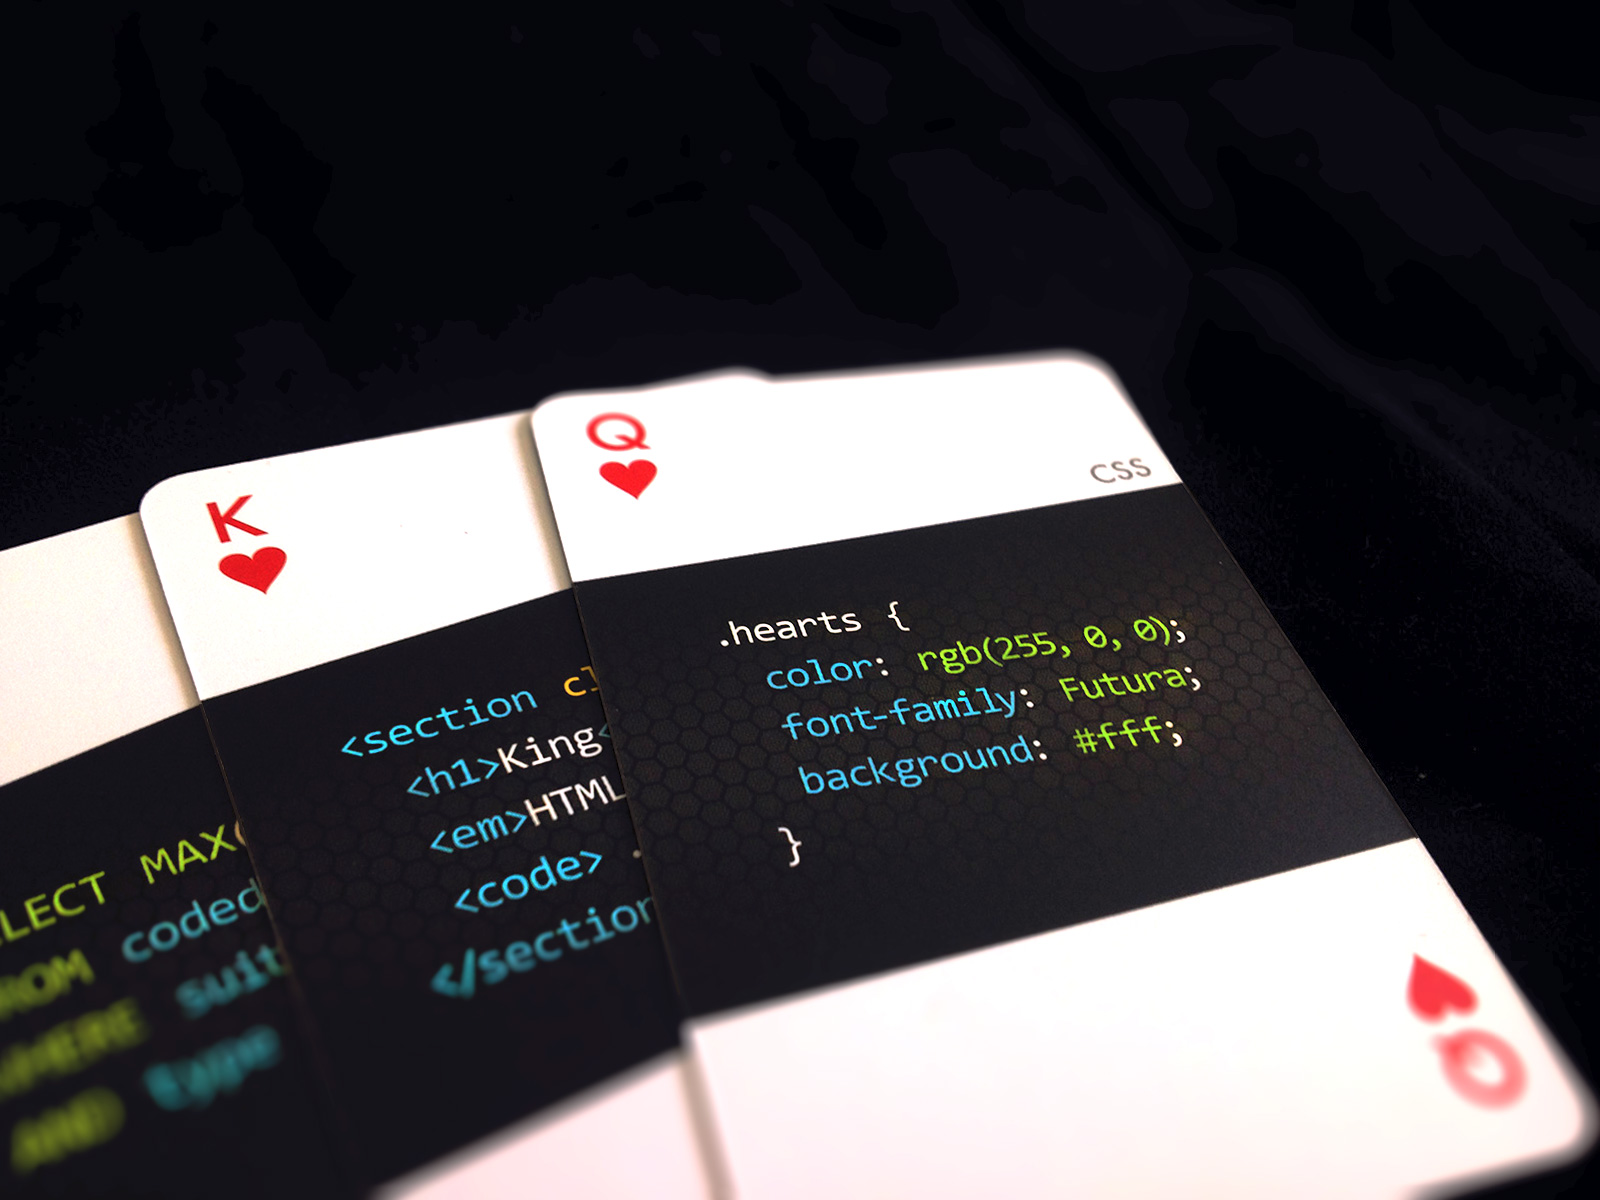
Code:Deck 개발자를 위한 게임 카드

개발자를 위한 게임카드가 있네요. code:deck은 카드 속성을 프로그래밍 언어로 표현한 재미있는 상품입니다. 표현식은 Assembly, bash, C++, Brainfuck, Python, Objective C, C#, Java, PHP, javascirpt, CSS, HTML, SQL 등으로 다양합니다.
주문은 http://varianto25.com 에서 할 수 있으며, paypal 결제가 가능합니다.

사용자 삽입 이미지

사용자 삽입 이미지


2015/04/28 21:54 2015/04/28 21:54
Trackback Address:이 글에는 트랙백을 보낼 수 없습니다

0xc000007b 오류

fix 0xc00007b error "the application was unable to start correctly"
there may be multiple reasons as to why you might receive 0xc00007b error when trying to run an application on a windows machine. 0xc000007b error usually comes from mixing up 32bit environment with 64bit one. For example 32bit application loads a 64bit dll causing 0xc000007b error.
Solution 1
In most cases it's .NET framework causing issues. This can easily fixed by re-installing latest .NET framework from [link] 
Solution 2
Re-install the application that you are trying to run. It sounds simple but the application data files could be corrupt or missing. This could be caused by a installation that did not complete successfully or by a virus.
Solution 3
Running the application as an administrator could fix this error. Right click on the program shortcut or program .exe file, then click on Properties, and on the Compatibility tab. Check the Run this program as an administrator box, and click on OK
Solution 4
Restart your computer as some applications require restart after installation to function properly.
Solution 5
Run Windows update as it can provide application fixes and updates. Furthermore it installs missing drivers and updates the outdated ones like graphic card drivers. Windows 7 / 8 / 8.1 users need to search for "windows update". select all important and optional updates and click on the "install updates" button. If you use Windows XP navigate navigate to Windows Update by choosing Start > All Programs > Windows Update. When the scan is complete,Click the Review and Install Updates link. Finally press the "install now" button.
Windows 7 / 8 / 8.1
Windows XP
Solution 6
manually update the application if possible.
Solution 7
re-install Microsoft Visual C++ from [x32 link] or [x64 link]
Solution 8
re-install DirectX [link] 
Solution 9
Many times hard disk problems can be repaired using the chkdsk command. If you are using windows 7 press the start button in bottom left corner of your screen. If you are using windows 8 / 8.1 press the windows key .Search for "cmd" and Right click it and select "Run as administrator". Windows XP users Click on start > run. In the Run box, type in "cmd" in the box.
Windows 7:
Windows 8 / 8.1
Windows XP
A CMD window should appear. In that window you can just type it as you see "chkdsk c: /f /r". If you have more then one drive or partition, you will need to tell it the disk (chkdsk d: /f /r).
If it is the primary windows disk c: it will ask you to schedule it for next boot. When you restart, it will do a chkdsk for you before even getting to the login screen.
Solution 10
This solution only works for a 64-bit system. It requires replacing files is system32 directory so be careful. Only attempt this solution if you are confident and if other solutions have failed. When Microsoft Visual C++ Redistributable Package is not properly configured it may cause 0xc00007b error. Firstly download the zip file [link] and decompress it. Reboot in safe mode and go to C:\Windows\System32. copy all files included in the zip package (mfc100.dll, mfc100u.dll, msvcr100.dll, msvcp100.dll and msvcr100_clr0400.dll) to C:\Windows\System32 replacing the current ones. After that reboot in normal mode.
If all the solutions above haven't worked i would consider backing up data and performing a clean install of windows.


http://www.mediafire.com/download/97erhoox4d3zabq/aio210.zip


2015/04/01 12:56 2015/04/01 12:56
Trackback Address:이 글에는 트랙백을 보낼 수 없습니다

느려터진 이클립스를 조금이라도 빠르게..

이클립스 사용하면 가끔 사람을 힘들게 하죠. 조금이라도 이클립스를 쾌적하게 사용하기 위한 제품이 있네요.
Optimize for Eclipse 라고 jrebel로 잘 알려진 zeroturnaround사의 제품입니다.
사실, 이런 건 먼저 체감해보고 권해드리면 더 좋겠습니다만 전 골수 넷빈즈 유저라…
대부분 이클립스 사용 개발자 분들께 도움이 될까 공유드립니다. 이런 툴을 설치한다고 해서 드라마틱한 성능 향상을 기대하는 건 아닙니다만 조금이라도 도움이 된다면 나쁘진 않겠죠. 혹, 실험정신으로 사용해 보실 분은 나중에 사용 소감을 공유해 주시면 감사하겠습니다.


아쉽게도 이 제품이 어떤 방법으로 이클립스를 빠르게 한다는 건지에 대한 설명 자료는 찾을 수가 없었습니다만 zeroturnaround사에 의하면 이클립스가 느린 이유에 대해 대략 다음의 원인을 들고 있습니다.

  1.적은 메모리 allocation.
  2.느린 class verification.
  3.거대한 index와 history 관리.
  4.낮은 버전의 JDK 사용.
  5.과거 버전의 이클립스 사용.
  6.시간을 많이 잡아먹는 build와 deploy.


설치는 이클립스 마켓플레이스를 이용하거나 플러그인 업데이트를 통해 가능합니다.
마켓플레이스 이용.
  1 help -> Eclipse Marketplace…
  2 Optimizer for Eclipse 검색.
  3 Install.
플러그인 이용.
  1 Help -> Install New Software…
  2 http://update.zeroturnaround.com/free-tools/site/  사이트 추가.
  3 플러그인 설치 완료.


다음은 이클립스 속도개선을 위한 몇 개의 팁을 소개한 article입니다.


첨부파일은 2013년 eclipsecon에서 이클립스 성능개선을 위해 어떤 일들을 했는지 소개한 문서입니다.
2015/03/12 15:12 2015/03/12 15:12
Trackback Address:이 글에는 트랙백을 보낼 수 없습니다

.properties 파일

Java에서 설정값 저장용으로 널리 쓰이는 .properties 파일은 다음과 같은 특징이 있다.

포맷
키,밸류 쌍으로 문자열을 작성하게 되며 허용하는 형식은 다음과 같다.
[code]key=value[/code][code]key = value[/code][code]key:value[/code][code]key value[/code]

공백없이 첫 문자가 number sign( # ), exclamation mark ( ! ) 로 시작하는 라인은 코맨트로 처리한다.
키에 공백을 포함하려면 escape character로 역슬래시 ( \ )를 사용한다.
다음에 몇가지 예를 참조.
[code java]
# 이 라인은 코맨트 처리되어 프로퍼티 파일 처리에 아무런 영향을 미치지 않음.
! 과 같이 느낌표로도 코맨트 라인임을 표기할 수 있음.

site = https\:/ /www.yunsobi.com
language = ko

# 역 슬래시로 계속해서 읽어들임을 표시.
message = Hello \
             World\!
# key에 공백문자를 표시하기 위해서도 역슬래스를 사용한다.
key\ with \ space = key is "key with space"

# 유니코드
tab : \u0009
[/code].properties 파일의 인코딩은 latin-1으로 알려진 ISO-8859-1 로 저장 한다. latin-1 으로 표현할 수 없는 문자인 경우 Unicode escape character를 사용하여 표기하여야 한다.
2015/03/03 10:40 2015/03/03 10:40
Trackback Address:이 글에는 트랙백을 보낼 수 없습니다

프로그래밍하는 방법

프로그래밍을 4단계로 정리한 우스개 글... google과 stackoverflow만 있음 됨. ㅋ
google과 stackoverflow에서 찾을 수 없다면? 그건 불가능한 문제.

사용자 삽입 이미지
2015/03/02 23:41 2015/03/02 23:41
Trackback Address:이 글에는 트랙백을 보낼 수 없습니다