RMI구현 방법도 이전( JDK 1.3 )과는 조금 달라졌다.
이전과는 많은 부분이 바뀌어 있어서 참고용 링크를 남김.
Qusay H. Mahmoud
January 2002
The Java Remote Method Invocation (RMI) mechanism and the Common Object Request Broker Architecture (CORBA) are the two most important and widely used distributed object systems. Each system has its own features and shortcomings. Both are being used in the industry for various applications ranging from e-commerce to health care. Selecting which of these two distribution mechanisms to use for a project is a tough task. This article presents an overview of RMI and CORBA, and more importantly it shows how to develop a useful application for downloading files from remote hosts. It then:
- Presents a brief overview of distributed object systems
- Provides a brief overview of RMI and CORBA
- Gives you a flavor of the effort involved in developing applications in RMI and CORBA
- Shows how to transfer files from remote machines using RMI and CORBA
- Provides a brief comparison of RMI and CORBA
The Client/Server Model
The client/server model is a form of distributed computing in which one program (the client) communicates with another program (the server) for the purpose of exchanging information. In this model, both the client and server usually speak the same language -- a protocol that both the client and server understand -- so they are able to communicate.
While the client/server model can be implemented in various ways, it is typically done using low-level sockets. Using sockets to develop client/server systems means that we must design a protocol, which is a set of commands agreed upon by the client and server through which they will be able to communicate. As an example, consider the HTTP protocol that provides a method called GET, which must be implemented by all web servers and used by web clients (browsers) in order to retrieve documents.
The Distributed Objects Model
A distributed object-based system is a collection of objects that isolates the requesters of services (clients) from the providers of services (servers) by a well-defined encapsulating interface. In other words, clients are isolated from the implementation of services as data representations and executable code. This is one of the main differences that distinguishes the distributed object-based model from the pure client/server model.
In the distributed object-based model, a client sends a message to an object, which in turns interprets the message to decide what service to perform. This service, or method, selection could be performed by either the object or a broker. The Java Remote Method Invocation (RMI) and the Common Object Request Broker Architecture (CORBA) are examples of this model.
RMI
RMI is a distributed object system that enables you to easily develop distributed Java applications. Developing distributed applications in RMI is simpler than developing with sockets since there is no need to design a protocol, which is an error-prone task. In RMI, the developer has the illusion of calling a local method from a local class file, when in fact the arguments are shipped to the remote target and interpreted, and the results are sent back to the callers.
The Genesis of an RMI Application
Developing a distributed application using RMI involves the following steps:
- Define a remote interface
- Implement the remote interface
- Develop the server
- Develop a client
- Generate Stubs and Skeletons, start the RMI registry, server, and client
We will now examine these steps through the development of a file transfer application.
Example: File Transfer Application
This application allows a client to transfer (or download) any type of file (plain text or binary) from a remote machine. The first step is to define a remote interface that specifies the signatures of the methods to be provided by the server and invoked by clients.
Define a remote interface
The remote interface for the file download application is shown in Code Sample 1. The interface FileInterface provides one method downloadFile that takes a String argument (the name of the file) and returns the data of the file as an array of bytes.
Code Sample 1: FileInterface.java
| [code]
import java.rmi.Remote;
import java.rmi.RemoteException;
public interface FileInterface extends Remote {
public byte[] downloadFile(String fileName) throws
RemoteException;
}
[/code] |
Note the following characteristics about the FileInterface:
- It must be declared public, in order for clients to be able to load remote objects which implement the remote interface.
- It must extend the Remote interface, to fulfill the requirement for making the object a remote one.
- Each method in the interface must throw a java.rmi.RemoteException.
Implement the remote interface
The next step is to implement the interface FileInterface. A sample implementation is shown in Code Sample 2. Note that in addition to implementing the FileInterface, the FileImpl class is extending the UnicastRemoteObject. This indicates that the FileImpl class is used to create a single, non-replicated, remote object that uses RMI's default TCP-based transport for communication.
Code Sample 2: FileImpl.java
| [code]
import java.io.*;
import java.rmi.*;
import java.rmi.server.UnicastRemoteObject;
public class FileImpl extends UnicastRemoteObject
implements FileInterface {
private String name;
public FileImpl(String s) throws RemoteException{
super();
name = s;
}
public byte[] downloadFile(String fileName){
try {
File file = new File(fileName);
byte buffer[] = new byte[(int)file.length()];
BufferedInputStream input = new
BufferedInputStream(new FileInputStream(fileName));
input.read(buffer,0,buffer.length);
input.close();
return(buffer);
} catch(Exception e){
System.out.println("FileImpl: "+e.getMessage());
e.printStackTrace();
return(null);
}
}
}
[/code] |
Develop the server
The third step is to develop a server. There are three things that the server needs to do:
- Create an instance of the RMISecurityManager and install it
- Create an instance of the remote object (FileImpl in this case)
- Register the object created with the RMI registry. A sample implementation is shown in Code Sample 3.
Code Sample 3: FileServer.java
| [code]
import java.io.*;
import java.rmi.*;
public class FileServer {
public static void main(String argv[]) {
if(System.getSecurityManager() == null) {
System.setSecurityManager(new RMISecurityManager());
}
try {
FileInterface fi = new FileImpl("FileServer");
Naming.rebind("//127.0.0.1/FileServer", fi);
} catch(Exception e) {
System.out.println("FileServer: "+e.getMessage());
e.printStackTrace();
}
}
}
[/code] |
The statement Naming.rebind("//127.0.0.1/FileServer", fi) assumes that the RMI registry is running on the default port number, which is 1099. However, if you run the RMI registry on a different port number it must be specified in that statement. For example, if the RMI registry is running on port 4500, then the statement becomes:
Naming.rebind("//127.0.0.1:4500/FileServer", fi)
Also, it is important to note here that we assume the rmi registry and the server will be running on the same machine. If they are not, then simply change the address in the rebind method.
Develop a client
The next step is to develop a client. The client remotely invokes any methods specified in the remote interface (FileInterface). To do so however, the client must first obtain a reference to the remote object from the RMI registry. Once a reference is obtained, the downloadFile method is invoked. A client implementation is shown in Code Sample 4. In this implementation, the client accepts two arguments at the command line: the first one is the name of the file to be downloaded and the second one is the address of the machine from which the file is to be downloaded, which is the machine that is running the file server.
Code Sample 4: FileClient.java
| [code]
import java.io.*;
import java.rmi.*;
public class FileClient{
public static void main(String argv[]) {
if(argv.length != 2) {
System.out.println("Usage: java FileClient fileName machineName");
System.exit(0);
}
try {
String name = "//" + argv[1] + "/FileServer";
FileInterface fi = (FileInterface) Naming.lookup(name);
byte[] filedata = fi.downloadFile(argv[0]);
File file = new File(argv[0]);
BufferedOutputStream output = new
BufferedOutputStream(new FileOutputStream(file.getName()));
output.write(filedata,0,filedata.length);
output.flush();
output.close();
} catch(Exception e) {
System.err.println("FileServer exception: "+ e.getMessage());
e.printStackTrace();
}
}
}
[/code] |
Running the Application
In order to run the application, we need to generate stubs and skeletons, compile the server and the client, start the RMI registry, and finally start the server and the client.
To generate stubs and skeletons, use the rmic compiler:
prompt> rmic FileImpl
This will generate two files: FileImpl_Stub.class and FileImpl_Skel.class. The stub is a client proxy and the skeleton is a server skeleton.
The next step is to compile the server and the client. Use the javac compiler to do this. Note however, if the server and client are developed on two different machines, in order to compile the client you need a copy of the interface (FileInterface).
Finally, it is time to start the RMI registry and run the server and client. To start the RMI registry on the default port number, use the command rmiregistry or start rmiregistry on Windows. To start the RMI registry on a different port number, provide the port number as an argument to the RMI registry:
prompt> rmiregistry portNumber
Once the RMI registry is running, you can start the server FileServer. However, since the RMI security manager is being used in the server application, you need a security policy to go with it. Here is a sample security policy:
[code]
grant {
permission java.security.AllPermission "", "";
};
[/code]
Note: this is just a sample policy. It allows anyone to do anything. For your mission critical applications, you need to specify more constraint security policies.
Now, in order to start the server you need a copy of all the classes (including stubs and skeletons) except the client class (FileClient.class). To start the server use the following command, assuming that the security policy is in a file named policy.txt:
prompt> java -Djava.security.policy=policy.txt FileServer
To start the client on a different machine, you need a copy of the remote interface (FileInterface.class) and stub (FileImpl_Stub.class). To start the client use the command:
prompt> java FileClient fileName machineName
where fileName is the file to be downloaded and machineName is the machine where the file is located (the same machine runs the file server). If everything goes ok then the client exists and the file downloaded is on the local machine.
To run the client we mentioned that you need a copy of the interface and stub. A more appropriate way to do this is to use RMI dynamic class loading. The idea is you do not need copies of the interface and the stub. Instead, they can be located in a shared directory for the server and the client, and whenever a stub or a skeleton is needed, it is downloaded automatically by the RMI class loader. To do this you run the client, for example, using the following command: java -Djava.rmi.server.codebase=http://hostname/locationOfClasses FileClient fileName machineName. For more information on this, please see Dynamic Code Loading using RMI.
CORBA
The Common Object Request Broker Architecture (or CORBA) is an industry standard developed by the Object Management Group (OMG) to aid in distributed objects programming. It is important to note that CORBA is simply a specification. A CORBA implementation is known as an ORB (or Object Request Broker). There are several CORBA implementations available on the market such as VisiBroker, ORBIX, and others. JavaIDL is another implementation that comes as a core package with the JDK1.3 or above.
CORBA was designed to be platform and language independent. Therefore, CORBA objects can run on any platform, located anywhere on the network, and can be written in any language that has Interface Definition Language (IDL) mappings.
Similar to RMI, CORBA objects are specified with interfaces. Interfaces in CORBA, however, are specified in IDL. While IDL is similar to C++, it is important to note that IDL is not a programming language. For a detailed introduction to CORBA, please see Distributed Programming with Java: Chapter 11 (Overview of CORBA).
The Genesis of a CORBA Application
There are a number of steps involved in developing CORBA applications. These are:
- Define an interface in IDL
- Map the IDL interface to Java (done automatically)
- Implement the interface
- Develop the server
- Develop a client
- Run the naming service, the server, and the client.
We now explain each step by walking you through the development of a CORBA-based file transfer application, which is similar to the RMI application we developed earlier in this article. Here we will be using the JavaIDL, which is a core package of JDK1.3+.
Define the Interface
When defining a CORBA interface, think about the type of operations that the server will support. In the file transfer application, the client will invoke a method to download a file. Code Sample 5 shows the interface for FileInterface. Data is a new type introduced using the typedef keyword. A sequence in IDL is similar to an array except that a sequence does not have a fixed size. An octet is an 8-bit quantity that is equivalent to the Java type byte.
Note that the downloadFile method takes one parameter of type string that is declared in. IDL defines three parameter-passing modes: in (for input from client to server), out (for output from server to client), and inout (used for both input and output).
Code Sample 5: FileInterface.idl
[code]
interface FileInterface {
typedef sequence<octet> Data;
Data downloadFile(in string fileName);
};
[/code]
Once you finish defining the IDL interface, you are ready to compile it. The JDK1.3+ comes with the idlj compiler, which is used to map IDL definitions into Java declarations and statements.
The idlj compiler accepts options that allow you to specify if you wish to generate client stubs, server skeletons, or both. The -f<side> option is used to specify what to generate. The side can be client, server, or all for client stubs and server skeletons. In this example, since the application will be running on two separate machines, the -fserver option is used on the server side, and the -fclient option is used on the client side.
Now, let's compile the FileInterface.idl and generate server-side skeletons. Using the command:
prompt> idlj -fserver FileInterface.idl
This command generates several files such as skeletons, holder and helper classes, and others. An important file that gets generated is the _FileInterfaceImplBase, which will be subclassed by the class that implements the interface.
Implement the interface
Now, we provide an implementation to the downloadFile method. This implementation is known as a servant, and as you can see from Code Sample 6, the class FileServant extends the _FileInterfaceImplBase class to specify that this servant is a CORBA object.
Code Sample 6: FileServant.java
| [code]
import java.io.*;
public class FileServant extends _FileInterfaceImplBase {
public byte[] downloadFile(String fileName){
File file = new File(fileName);
byte buffer[] = new byte[(int)file.length()];
try {
BufferedInputStream input = new
BufferedInputStream(new FileInputStream(fileName));
input.read(buffer,0,buffer.length);
input.close();
} catch(Exception e) {
System.out.println("FileServant Error: "+e.getMessage());
e.printStackTrace();
}
return(buffer);
}
}
[/code] |
Develop the server
The next step is developing the CORBA server. The FileServer class, shown in Code Sample 7, implements a CORBA server that does the following:
- Initializes the ORB
- Creates a FileServant object
- Registers the object in the CORBA Naming Service (COS Naming)
- Prints a status message
- Waits for incoming client requests
Code Sample 7: FileServer.java
| [code]
import java.io.*;
import org.omg.CosNaming.*;
import org.omg.CosNaming.NamingContextPackage.*;
import org.omg.CORBA.*;
public class FileServer {
public static void main(String args[]) {
try{
// create and initialize the ORB
ORB orb = ORB.init(args, null);
// create the servant and register it with the ORB
FileServant fileRef = new FileServant();
orb.connect(fileRef);
// get the root naming context
org.omg.CORBA.Object objRef =
orb.resolve_initial_references("NameService");
NamingContext ncRef = NamingContextHelper.narrow(objRef);
// Bind the object reference in naming
NameComponent nc = new NameComponent("FileTransfer", " ");
NameComponent path[] = {nc};
ncRef.rebind(path, fileRef);
System.out.println("Server started....");
// Wait for invocations from clients
java.lang.Object sync = new java.lang.Object();
synchronized(sync){
sync.wait();
}
} catch(Exception e) {
System.err.println("ERROR: " + e.getMessage());
e.printStackTrace(System.out);
}
}
}
[/code] |
Once the FileServer has an ORB, it can register the CORBA service. It uses the COS Naming Service specified by OMG and implemented by Java IDL to do the registration. It starts by getting a reference to the root of the naming service. This returns a generic CORBA object. To use it as a NamingContext object, it must be narrowed down (in other words, casted) to its proper type, and this is done using the statement:
NamingContext ncRef = NamingContextHelper.narrow(objRef);
The ncRef object is now an org.omg.CosNaming.NamingContext. You can use it to register a CORBA service with the naming service using the rebind method.
Develop a client
The next step is to develop a client. An implementation is shown in Code Sample 8. Once a reference to the naming service has been obtained, it can be used to access the naming service and find other services (for example the FileTransfer service). When the FileTransfer service is found, the downloadFile method is invoked.
Code Sample 8: FileClient
| [code]
import java.io.*;
import java.util.*;
import org.omg.CosNaming.*;
import org.omg.CORBA.*;
public class FileClient {
public static void main(String argv[]) {
try {
// create and initialize the ORB
ORB orb = ORB.init(argv, null);
// get the root naming context
org.omg.CORBA.Object objRef =
orb.resolve_initial_references("NameService");
NamingContext ncRef = NamingContextHelper.narrow(objRef);
NameComponent nc = new NameComponent("FileTransfer", " ");
// Resolve the object reference in naming
NameComponent path[] = {nc};
FileInterfaceOperations fileRef =
FileInterfaceHelper.narrow(ncRef.resolve(path));
if(argv.length < 1) {
System.out.println("Usage: java FileClient filename");
}
// save the file
File file = new File(argv[0]);
byte data[] = fileRef.downloadFile(argv[0]);
BufferedOutputStream output = new
BufferedOutputStream(new FileOutputStream(argv[0]));
output.write(data, 0, data.length);
output.flush();
output.close();
} catch(Exception e) {
System.out.println("FileClient Error: " + e.getMessage());
e.printStackTrace();
}
}
}
[/code] |
Running the application
The final step is to run the application. There are several sub-steps involved:
- Running the the CORBA naming service. This can be done using the command tnameserv. By default, it runs on port 900. If you cannot run the naming service on this port, then you can start it on another port. To start it on port 2500, for example, use the following command:
prompt> tnameserv -ORBinitialPort 2500
- Start the server. This can be done as follows, assuming that the naming service is running on the default port number:
prompt> java FileServer
If the naming service is running on a different port number, say 2500, then you need to specify the port using the ORBInitialPort option as follows:
prompt> java FileServer -ORBInitialPort 2500
- Generate Stubs for the client. Before we can run the client, we need to generate stubs for the client. To do that, get a copy of the FileInterface.idl file and compile it using the idlj compiler specifying that you wish to generate client-side stubs, as follows:
prompt> idlj -fclient FileInterface.idl
- Run the client. Now you can run the client using the following command, assuming that the naming service is running on port 2500.
prompt> java FileClient hello.txt -ORBInitialPort 2500
Where hello.txt is the file we wish to download from the server.
Note: if the naming service is running on a different host, then use the -ORBInitialHost option to specify where it is running. For example, if the naming service is running on port number 4500 on a host with the name gosling, then you start the client as follows:
prompt> java FileClient hello.txt -ORBInitialHost gosling -ORBInitialPort 4500
Alternatively, these options can be specified at the code level using properties. So instead of initializing the ORB as:
ORB orb = ORB.init(argv, null);
It can be initialized specifying that the CORBA server machine (called gosling) and the naming service's port number (to be 2500) as follows:
[code]
Properties props = new Properties();
props.put("org.omg.CORBA.ORBInitialHost", "gosling");
props.put("orb.omg.CORBA.ORBInitialPort", "2500");
ORB orb = ORB.init(args, props);
[/code]
Exercise
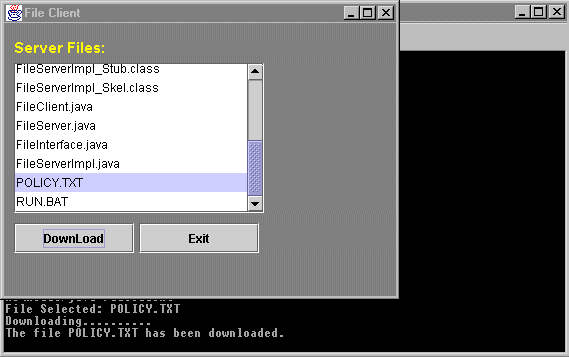
In the file transfer application, the client (in both cases RMI and CORBA) needs to know the name of the file to be downloaded in advance. No methods are provided to list the files available on the server. As an exercise, you may want to enhance the application by adding another method that lists the files available on the server. Also, instead of using a command-line client you may want to develop a GUI-based client. When the client starts up, it invokes a method on the server to get a list of files then pops up a menu displaying the files available where the user would be able to select one or more files to be downloaded as shown in Figure 1.
Figure 1: GUI-based File Transfer Client
CORBA vs. RMI
Code-wise, it is clear that RMI is simpler to work with since the Java developer does not need to be familiar with the Interface Definition Language (IDL). In general, however, CORBA differs from RMI in the following areas:
- CORBA interfaces are defined in IDL and RMI interfaces are defined in Java. RMI-IIOP allows you to write all interfaces in Java (see RMI-IIOP).
- CORBA supports in and out parameters, while RMI does not since local objects are passed by copy and remote objects are passed by reference.
- CORBA was designed with language independence in mind. This means that some of the objects can be written in Java, for example, and other objects can be written in C++ and yet they all can interoperate. Therefore, CORBA is an ideal mechanism for bridging islands between different programming languages. On the other hand, RMI was designed for a single language where all objects are written in Java. Note however, with RMI-IIOP it is possible to achieve interoperability.
- CORBA objects are not garbage collected. As we mentioned, CORBA is language independent and some languages (C++ for example) does not support garbage collection. This can be considered a disadvantage since once a CORBA object is created, it continues to exist until you get rid of it, and deciding when to get rid of an object is not a trivial task. On the other hand, RMI objects are garbage collected automatically.
Conclusion
Developing distributed object-based applications can be done in Java using RMI or JavaIDL (an implementation of CORBA). The use of both technologies is similar since the first step is to define an interface for the object. Unlike RMI, however, where interfaces are defined in Java, CORBA interfaces are defined in the Interface Definition Language (IDL). This, however, adds another layer of complexity where the developer needs to be familiar with IDL, and equally important, its mapping to Java.
Making a selection between these two distribution mechanisms really depends on the project at hand and its requirements. I hope this article has provided you with enough information to get started developing distributed object-based applications and enough guidance to help you select a distribution mechanism.


 sample_chapter07.pdf