MongoDB 3.6에서 4.0으로 Upgrade 참고 문서

2020/01/20 00:29

서비 Tip&Tech

버전 마이그레이션
https://www.slideshare.net/antgiann/upgrading-to-mongodb-40-from-older-versions


성능 측정
https://medium.com/@hartator/mongodb-4-2-vs-4-0-3-6-3-4-and-3-2-benchmarks-ee96a09ef231


2020/01/20 00:29 2020/01/20 00:29
Trackback Address:이 글에는 트랙백을 보낼 수 없습니다
  1. Blog Icon
    비밀방문자

    관리자만 볼 수 있는 댓글입니다.

logrotate

logrotate 관련 파일
# /usr/sbin/logrotate : 데몬의 위치 및 데몬프로그램
# /etc/logrotate.conf : 설정 파일.
# /etc/logrotate.d : logrotate를 적용할 로그 파일 보관 디렉토리.
# /var/lib/logrotate.status : logrotate가 작업 내역 보관 파일.
# /etc/cron.daily/logrotate : logrotate : cron 에 의해 일 단위로 실행한다.

동작 순서
1. cron.daily 에서 /usr/sbin/logrotate 호출 
2. /usr/sbin/logrotate 에서 /etc/logrotate.conf 설정파일 참조 
3. /etc/logrotate.conf 설정 파일에서 /etc/logrotate.d 참조 

# sudo vi /etc/logrotate.d/apache
[code] /var/logs/apache/access_log {
  su apache apache
  create 0644 apache apache
  size +1k
  missingok
  notifempty
  compress
  dateext
  postrotate
    /usr/bin/killall -HUP httpd
  endscript
} [/code]

강제실행
# /usr/sbin/logrotate -f /etc/logrotate.d/apache

테스트
# /usr/sbin/logrotate -d /etc/logrotate.d/apache

copytruncate옵션을 활용하면 postrotate를 통한 프로세스 재시작이 불필요하나 copy-truncate 시점의 로그는 손실 됨.
2017/05/30 10:56 2017/05/30 10:56
Trackback Address:이 글에는 트랙백을 보낼 수 없습니다

뭐? 몽고DB랑 Elasticsearch도 랜섬웨어에 당한다고?

2017/01/19 09:49

서비 Tip&Tech

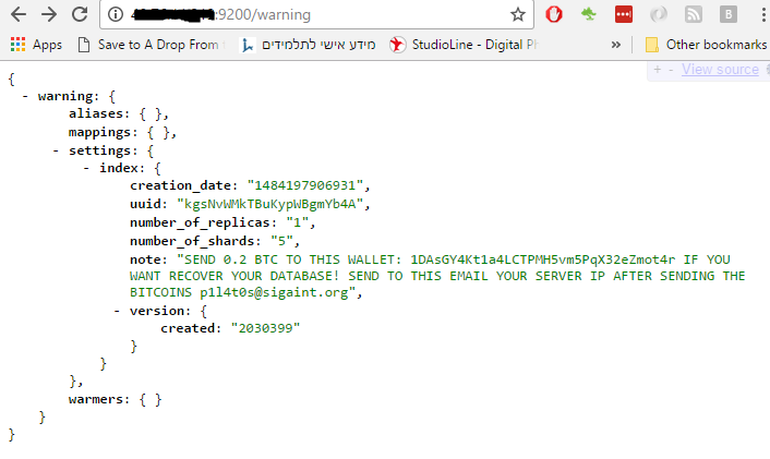
몽고DB의 취약점을 이용한 랜섬웨어가 있다고합니다. 근데.. 그걸 모방해서 Elasticsearch도 당하고 있다네요.
당하면 데이터를 삭제하고 비트코인 요구..
이미지 출저 - zdnet

이미지 출저 - zdnet


몽고DB측 기사는 이렇습니다.
https://www.mongodb.com/blog/post/how-to-avoid-a-malicious-attack-that-ransoms-your-data

zdnet의 elasticsearch 관련 기사는 다음과 같고요..
http://www.zdnet.com/article/first-came-mass-mongodb-ransacking-now-copycat-ransoms-hit-elasticsearch/

예방책은 몽고DB나 elasticsearch의 서비스 port를 public으로 열어놓지말고
사용자 접근제어 설정을 하고 방화벽, VPN, 프록시 서버 등을 이용해 접속하는것을 권고합니다.
2017/01/19 09:49 2017/01/19 09:49
Trackback Address:이 글에는 트랙백을 보낼 수 없습니다

함수형 언어에서 UML은 어떻게 사용하나?

함수형 언어 개발자는 일반적으로 다이어그램을 사용하지 않는다. (전부는 아니지만) 대부분의 함수형 언어 개발자는 OOP 언어 개발자가 UML을 통해 표현하는 객체사이의 관계를 types를 통해 기술하곤 한다.
이유는 함수형 프로그래밍에서 변경가능한 object 가 존재하지 않기때문에  "변경가능" 이란 상황이 극히 드물기때문에 객체사이의 관계를 다이어그램으로 표현하는게 필요하나거나 도움이된다거나 하지않기때문이다.
또한 한 function에서 다른 function을 호출할때 속성(property)은 설계된 디자인보다는 function이 호출하는 기능의 구현에 더 영향을 받는게 일반적이기때문이다.

함수형 언어에서의 UML표현이 꼭 필요한 상황이라면 types나 function의 개념을 설명할 수 있는 concept map 을 확인해 보기 바란다.


2016/10/11 15:43 2016/10/11 15:43
Trackback Address:이 글에는 트랙백을 보낼 수 없습니다

아파치 kafka 0.10.0 offset 초기화 현상

최근 프로젝트를 하나 진행하면서 데이터 파이프라인으로 아파치 카프카 0.10.0을 도입하였다.
기존 프로젝트에서 이미 0.8.1을 도입하여 진행한적이 있어 도입 자체는 부담이 없었고.. 0.9를 거치면서 producer, consumer API가 많이 정비되었고 0.10.0에 와서는 stream process 지원이 강화된 부분이 마음에 들어서이다.

개발 완료 후 QA를 진행하는데 특이한점이 나타났다. 카프카 토픽의 데이터가 일정주기로 다시 읽어지는 현상이 나타난 것이다. 토픽으로 새로운 데이터의 유입이 없는것과 다시 읽어지는 데이터가 과거 데이터인것을 확인하는 순간.. '머지 이건?!!'

0.8.1을 사용하는 이전 프로젝트에서는 consumer로 subscription을 하면 점검, 장애의 이유가 아니라면 브로커와 연결을 지속한 형태로 구현했는데, 이번에는 컨슈머가 짧은주기로 subscription, unsubscription을 반복하는 구성이 다른점이다.

현상만으로 보면 어떤 이유에서 컨슈머그룹의 offset 정보가 초기화 되는것 같았고 이를 토대로 코드와 카프카 설정을 몇 번을 리뷰했지만 특이사항을 찾지못하고 수일이 흘렀다. 한가지 특이사항이라면 offset이 리셋되는 주기가 일정한듯 한 현상이 보였다.

주말에 StackOverflow에서 카프카 관련주제를 검토하다가 드디어 해결의 단초를 찾았다.
결국 작성한 코드의 이슈는 아니고.. 0.9버전부터 변경된 오프셋 관리방식(0.8.x까지는 주키퍼가, 0.9부터는 카프카측에서 관리)과 새 버전 카프카 브로커  설정 기본값으로 인한 현상이었다.
키워드는 브로커 설정의 offsets.retention.minutes. 기본값이 1440분, 즉 24시간 유지라네...  0.10 문서 충분히 읽고 검토했다고 생각했는데... 이런 중요한 설정을 놓쳤을 줄은 상상도 못했다.

이와 관련한 이슈와 메일링 리스트
https://issues.apache.org/jira/browse/KAFKA-3806
https://mail-archives.apache.org/mod_mbox/kafka-dev/201606.mbox/%3CJIRA.12976894.1465398960000.46560.1465511841061@Atlassian.JIRA%3E
2016/08/02 09:18 2016/08/02 09:18
Trackback Address:이 글에는 트랙백을 보낼 수 없습니다

apache kafka, zookeeper 재기동 후 Unexpected exception, exiting abnornally java.io.EOFException 발생.

정기 점검으로 인해 운영중인 카프카/주키퍼를 재기동했더니  Unexpected exception, exiting abnornally java.io.EOFException 이 발생하면서 브로커가 정상적으로 동작을 하지 못하는 현상이 발생하였다.
원인은 Disk Full로 주키퍼의 트랜젝션 파일을 온전히 저장하지 못해서 발행하는 것이었다.

다음과 같은 조치를 통해 정상화 할 수 있다.

우선 카프카용 주키퍼의 데이터 경로 [KAFKA_HOME]/zookeeper-data/version2 에서
$ ls -lat 
명령으로 가장 최근에 만들어진 로그와 스냅샷 파일을 확인한 후
사이즈가 0이거나 마지막에 작성된 로그를 삭제하고 재기동하면 된다.

후속조치로는 [KAFKA_HOME]/logs 아래에 빼곡히 들어차 있는 controller.log , server.log, state-change.log 들을 주기적으로 삭제하는 스크립트를 만들고 크론으로 등록했다.
http://heyo.net/xe/prog_tip/1984
[code]
#!/bin/sh
PATH=/usr/local/sbin:/usr/local/bin:/usr/sbin:/usr/bin:/sbin:/bin
 
cd [KAFKA_HOME_PATH]/logs
find ./* \( -name 'controller.log.*' -o -name 'server.log.*' -o -name 'state-change.log.*' \) -mtime +30 -exec rm -f {} \;
find ./* \( -name 'controller.log.*' -o -name 'server.log.*' -o -name 'state-change.log.*' \) ! -name '*.Z' -mtime +7 -exec compress {} \;
[/code]


2016/06/03 13:27 2016/06/03 13:27
Trackback Address:이 글에는 트랙백을 보낼 수 없습니다

MSSQL Procedure 변경이력 확인

[code sql]SELECT *
FROM sys.sql_modules sm 
inner join sys.all_objects ao 
on sm.object_id = ao.object_id 
order by modify_date desc
[/code]
2016/03/23 14:57 2016/03/23 14:57
Trackback Address:이 글에는 트랙백을 보낼 수 없습니다

Executable jar 를 메이븐 exec:exec 로 실행 하기

Executable JAR 빌드 후 메이븐 exec:exec 로 실행하고 싶다면 exec-maven-plugin 을 사용할 수 있다. [code xml]<plugin>
  <groupId>org.codehaus.mojo</groupId>
  <artifactId>exec-maven-plugin</artifactId>
  <version>1.4.0</version>
  <executions>
    <execution>
      <id>default-cli</id>
      <goals>
          <goal>exec</goal>
      </goals>
      <configuration>
        <executable>java</executable>
        <!-- optional -->
        <workingDirectory>/tmp</workingDirectory>
        <arguments>
          <argument>-jar</argument>
          <argument>${basedir}/target/${project.artifactId}-${project.version}.jar</argument>
        </arguments>
      </configuration>                        
    </execution>
  </executions>
</plugin>[/code]

mvn exec:exec 가 아닌 mvn exec:java 로 컴파일 output 디렉토리에서 main class를 바로 실행하고 싶다면 다음과 같이 설정한다.
[code xml]<plugin>
  <groupId>org.codehaus.mojo</groupId>
  <artifactId>exec-maven-plugin</artifactId>
  <version>1.4.0</version>
  <executions>
    <executions>
      <execution>
        <goals>
            <goal>java</goal>
        </goals>
      </execution>
      <configuration>
        <mainClass>com.app.MainClass</mainClass>
        <arguments></arguments>
      </configuration>
    </executions>
  </executions>
</plugin> [/code]
2016/02/18 14:35 2016/02/18 14:35
Trackback Address:이 글에는 트랙백을 보낼 수 없습니다

Apache Kafka 0.9.0.0 변경점

아파치 카프카 0.9.0.0 는 이전 버전 대비 인증, SSL레이어 추가 등 많은 변화가 있었습니다.
kafka topic 중심의 변경점은 다음과 같음.

변경
  • 더 이상 Java 1.6 지원하지않음.
  • 더 이상 Scala 2.9 지원하지 않음.
  • 1000이상의 Broker ID는 자동으로 Broker ID를 할당하기 위해 예약되어 있음. 이미 1000 이상의 Broker ID를 사용하고 있다면 Broker Configuration의 reserved.broker.max.id 값을 임계값 이상으로 설정 해야 함.
  • replica.lag.max.messages 설정은 제거되었으며, 동기화 되는 복제본 결정할 때 파티션 리더는 더 이상 후행(lag) 메시지의 수를 고려 하지 않음.
  • replica.lag.time.max.ms 설정은 마지막 복제 요청으로 경과한 시간이 아닌 복제가 마지막으로 이뤄진 시간까지를 포함. 복제는 여전히 리더로부터 패치하며  replica.lag.time.max.ms 시간내에 복제가 되지 않으면 sync가 어긋난것으로 간주.
  • log.cleaner.enable 는 true 가 기본값이 됨. 이는 cleanup.policy=compact 을 설정 시 topic은 기본적으로 compact 적용, 128MB 힙사이즈가 log.cleaner.dedupe.buffer.size 설정을 통한 clear process에게 할당. compacted topics의 사용량에 따라 log.cleaner.dedupe.buffer.size 와 다른 log.cleaner 계열의 설정을 조정해야 할 수 있음.
  • MirrorMaker는 더 이상 multiple target clusters를 지원하지 않음. 그 결과로 단일 consumer.config 설정만 허용되며, 다중 소스 클러스터를 미러링 하려면 각각의 consumer configuration의 소스 클러스터당 적어도 하나 이상의 MirrorMaker 인스턴스가 필요함.
  • org.apache.kafka.clients.tools.* 는 org.apache.kafka.tools.* 로 이관. 
  • kafka-run-class.sh 내의 JVM 성능 옵션 (KAFKA_JVM_PERFORMANCE_OPTS) 변경.
  • kafka-topics.sh 스크립트 ( kafka.admin.TopicCommand )는 이제 실행 실패 시 0이 아닌 종료 코드로 종료.
  • kafka-topics.sh 스크립트 ( kafka.admin.TopicCommand )는 이제 '.' 이나 '_' 등 topic 이름이 충돌할 수 있는 경우 경고 메세지를 출력.
  • kafka-console-producer.sh 스크립트 ( kafka.tools.ConsoleProducer )는 기본값으로 이전 생산자 대신 새 프로듀서 를 사용,  기존의 프로듀서를 사용하려면  이전버전의 producer 사용을 명시 해야 함.
  • 기본적으로 명령줄 메세지는 stderr를 통해 출력.


삭제
  • kafka-topics.sh script (kafka.admin.TopicCommand)를 통한 topic 변경 명령은 deprecate됨. 앞으로는 kafka-configs.sh script (kafka.admin.ConfigCommand)를 사용할 것.
  • 오프셋을 확인용 명령 kafka-consumer-offset-checker.sh (kafka.tools.ConsumerOffsetChecker) 역시 deprecate됨. kafka-consumer-groups.sh (kafka.admin.ConsumerGroupCommand)를 사용 할 것.
  • kafka.tools.ProducerPerformance 클래스 deprecate 됨. org.apache.kafka.tools.ProducerPerformance 클래스를 사용 할 것. kafka-producer-perf-test.sh 역시 새로운 클래스 사용으로 변경 됨.
2016/02/03 09:53 2016/02/03 09:53
Trackback Address:이 글에는 트랙백을 보낼 수 없습니다

crontab 설정

필요할때마다 검색하기 구찮아서 정리해 둠

crontab [ -e | -l | -r | -v | File ]
-e : 수정 -l : 내용보기 -r : 삭제 -v : 작업상태보기

>crontab -e #주석 15 3 * * *      /home/koglo.com/public_html/system/autoftp.sh              >       /dev/null 2>&1
minute(분) hour(시) day_of_month(일) month(월) weekday(요일) command(명령)
minute(분) 0 - 59 hour(시) 0 - 23 day_of_month(일) 1 - 31 month(월) 1 - 12 weekday(요일) 일요일부터 금요일까지를 나타내는 0 - 6 command(명령) 쉘 명령

> /dev/null 표준출력내용을 null로보낸다
명령 지정 cron 데몬은 선택된 날짜와 시간의 여섯 번째 필드에 지정된 명령을 수행합니다. 
여섯 번째 필드에 %(퍼센트 기호)를 포함하면, cron 데몬은 그 앞에 오는 모든 것을 명령 호출로서 취급하고, 퍼센트 기호(\%)를 탈출하지 않는 한 그 뒤에 오는 모든 것을 표준 입력에 사용 가능하게 만듭니다. 공백 행과 첫번째 비공백 문자가 번호 기호(#)인 행을 무시됩니다.

예제 
mycronjobs이라는 파일을 /var/admn/cron/crontabs 디렉토리에 복사하려면, 다음과 같이 입력하십시오. 
crontab mycronjobs 

매 시간마다 콘솔에 시간을 기록하려면, 다음과 같이 입력하십시오. 
0 * * * * echo The hour is `date` . >/dev/console 

모든 월요일, 수요일 및 금요일 오전 6시 30분에 calendar 명령을 수행하려면, 다음과 같이 입력하십시오. 
30 6 * * 1,3,5 /usr/bin/calendar 

일년 내내 매일 6시 30분에 calendar 명령을 수행하려면, 다음과 같이 입력하십시오. 
30 6 * * * /usr/bin/calendar 

8월 동안 매일 자정에 maintenance라는 스크립트를 수행하려면, 다음과 같이 입력하십시오. 
0 0 * 8 * /u/harry/bin/maintenance 

명령에 대한 표준 입력에 대해 텍스트를 정의하려면, 다음과 같이 입력하십시오. 
0 16 * 12 5 /usr/sbin/wall%HAPPY HOLIDAY!%Remember to turn in your time card. 

%(퍼센트 기호) 뒤에 오는 텍스트가 다음과 같이 wall 명령에 대한 표준 입력을 정의합니다. 
HAPPY HOLIDAY! Remember to turn in your time card. 
파일 
/var/adm/cron/FIFO crontab 또는 at 명령으로 새 작업이 제출될 때 cron 디먼으로 메세지를 전송하는 명명된 파이프. 
/var/spool/cron/crontabs crontab 스풀 영역을 지정합니다. 
/var/adm/cron/cron.allow  crontab 명령에 대한 액세스가 허용되는 사용자 리스트를 지정합니다. 
/var/adm/cron/cron.deny crontab 명령에 대한 액세스가 거부되는 사용자 리스트를 지정합니다

0,30 * 1,15 * 1-5 fsck -y 
상기의 예에서 보면 매달 1일과 15일날 30분마다 요일에 관계없이 fsck -y명령을 실행하도록 되어 있다.
(위의 예는 있을 수 없는 상황이겠지만 예로 들어본다.) 이러한 방식으로 명령어필드에 여러가지의 내용을 넣을 수 있다.

20 1 * * * root find /tmp -atime +3 -exec rm -f () ';' 
매일 새벽 1시 20분에 3일간 접근하지 않은 /tmp내의 파일을 삭제하는 내용 

0 4 * * * root find / -xdev -name core +7 -exec rm -f {}';' 
매일 새벽 4시 정각에 지난 일주일간 접근하지 않은 core파일들을 삭제한다. -xdev옵션은 독립형시스템이면 사용하지 않아도 된다.

수정하는 방법은 리눅스의 경우에는 crontab -e명령으로 에디팅을 할 수 있다. 
수정하기 전에 지금 등록된 crontab을 보고자 하면 -l옵션을 사용하고 등록된 내용을 삭제하려면 -d옵션을 사용하면 된다.(-r옵션을 사용하는 유닉스도 있다.) 
실행결과는 메일로 알려주게 되므로 자신의 메일을 읽어보면 된다.
CRON 메일 전송 차단을 원하면
MAILTO=""

crontab을 직접 고칠 수 없는 상황이면 crontab을 -l옵션을 사용하여 새로운 화일명으로 리다이렉션 받아서 편집한 뒤에 crontab filename의 형태로 등록하면 된다. 
리눅스의 경우에는 /var/spool/cron/crontabs/에 자신의 계정을 화일명으로 crontab이 존재하고 있다.
2015/10/23 09:37 2015/10/23 09:37
Trackback Address:이 글에는 트랙백을 보낼 수 없습니다

메이븐 레파지토리에 없는 jar 추가하고 manifest 에 기술하기

IBM DB2를 가지고 개발할 일이 생겼다.
늘 하던대로 executeable-jar 형식으로 빌딩을 수행하는 메이븐 프로젝트를 구성하는데.. 으잉? DB2의 jdbc 드라이버 db2jcc4.jar가 메이븐센트럴에 등록되어있지 않는것이다. 뭐지.. 이건?
회사 넥서스에 등록하고 땡겨쓰면 되긴 하지만 넥서스같은 로컬 메이븐 레파지토리가 없는 환경에서 이런경우는 어떻게 해야하는지 궁금했다.
귀찮겠지만 빌드하고 라이브러리 폴더에 jar를 복사해도 되긴하지만 문제는 POM파일에 기술되지 않으면 dependancy 관리가 안된다는것. 곧 IDE에서 클래스를 참조할 수 없다는 치명적인 문제가 발생한다.

이럴때를 대비해 메이븐은 dependencies.dependency.scope 속성 값으로 system을 제공하고 있고 <scope>system</scope> 를 사용한 경우 추가로 systemPath 속성을 정의할 수 있다.

이렇게 말이지..
[code xml]     <dependencies>
        <dependency>
            <groupId>ibm.db2</groupId>
            <artifactId>db2jcc4</artifactId>
            <version>10.5</version>
            <scope>system</scope>
            <systemPath>${basedir}/lib/db2jcc4.jar</systemPath>
        </dependency>
    </dependencies>
[/code]
이제, 코드를 짤 수 있고 라이브러리 참조도 된다. 그런데.. 문제가 하나 있는데 <scope>system</scope> 속성은 메이븐 빌드 시 <scope>provided</scope> 와 마찬가지로 라이브러리를 빌드 결과물에 포함시키기 않는다.
이 현상은 maven-dependency-plugin의 configuration 조정을 통해 우회할 수 있다.
plugins.plugin.executions.execution.configuration.includeScope 속성을 추가하고 그 값으로 system 을 설정한다.
[code xml]             <plugin>
                <groupId>org.apache.maven.plugins</groupId>
                <artifactId>maven-dependency-plugin</artifactId>
                <version>2.10</version>
                <executions>
                    <execution>
                        <id>copy-dependencies</id>
                        <phase>package</phase>
                        <goals>
                            <goal>copy-dependencies</goal>
                        </goals>
                        <configuration>
                            <outputDirectory>${project.build.directory}/lib</outputDirectory>
                            <overWriteReleases>false</overWriteReleases>
                            <overWriteSnapshots>false</overWriteSnapshots>
                            <overWriteIfNewer>true</overWriteIfNewer>
                            <includeScope>system</includeScope>
                        </configuration>
                    </execution>
                </executions>
            </plugin>[/code]
이제 빌드를 수행하면 system 스코프로 설정된 db2jcc4.jar 가 /lib/db2jcc4-10.5.jar 란 이름으로 이쁘게 들어와 있는걸 확인할 수 있다.

나는 이 프로그램을 executeable-jar 로 뽑을거라서 maven-jar-plugin 을 사용한다. 그런데 빌드 후 jar 내부의 MENIFEST 파일을 까 보니 Class-Path 정의에 db2jcc4-10.5.jar 가 기술되어 있지 않다... maven-dependency-plugin을 통해 복사까진 어떻게 처리했는데 메니페스트를 만드는건 maven-jar-plugin 역할이니 당연한건지도 모르겠다.
이제 마지막으로 /lib/db2jcc4-10.5.jar 에 들어온 jar를 메니페스트의 class path에 꾸겨넣어보자.
 plugin.configuration.archive.manifestEntries.Class-Path 속성을 사용했다.

[code xml]    <plugin>
        <groupId>org.apache.maven.plugins</groupId>
        <artifactId>maven-jar-plugin</artifactId>
        <version>2.6</version>
        <configuration>
            <archive>
                <manifest>
                    <addClasspath>true</addClasspath>
                    <addExtensions>true</addExtensions> 
                    <mainClass>com.usbcopy.repository.DBProcess</mainClass>
                    <classpathPrefix>lib/</classpathPrefix>                            
                </manifest>
                <!--MANIFEST  with systemPath-->
                <manifestEntries>
                    <Class-Path>lib/db2jcc4-10.5.jar</Class-Path>
                </manifestEntries>
            </archive>
        </configuration>
    </plugin>[/code]
이제 빌드하고 java -jar app.jar 로 실행도 잘 된다.
2015/10/22 19:19 2015/10/22 19:19
Trackback Address:이 글에는 트랙백을 보낼 수 없습니다

java json 라이브러리 별 parser 속도 비교.

우선, 테스트 진행한 json 라이브러리 후보군은
  • JSON.simple ( Yidong Fang )
  • GSON ( Google )
  • Jackson ( FasterXML )
  • JSONP  ( Oracle )
과 같음. 상기 라이브러리를 이용한 비교적 큰 사이즈의 json 문서 파싱 속도 벤치마킹 결과를 java 어플리케이션 성능평가/모니터링 도구를 개발하는 Takipi에서 공개.

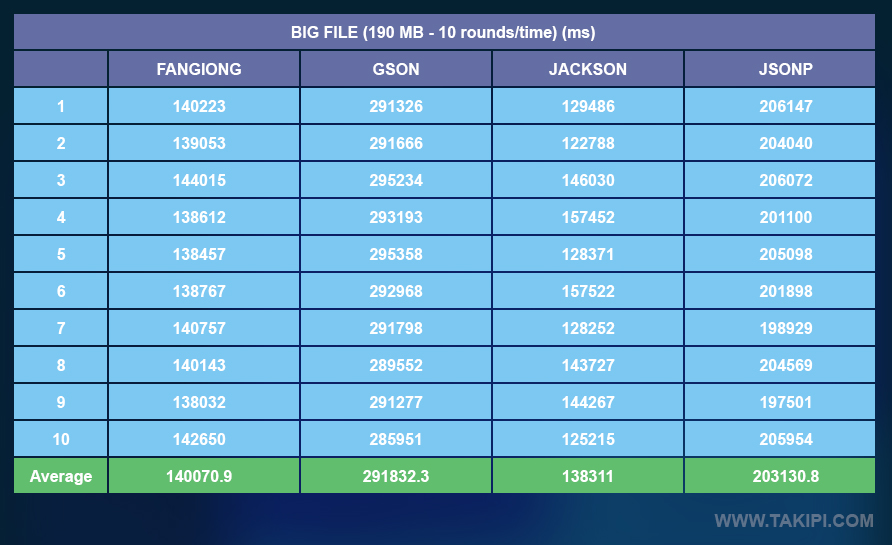
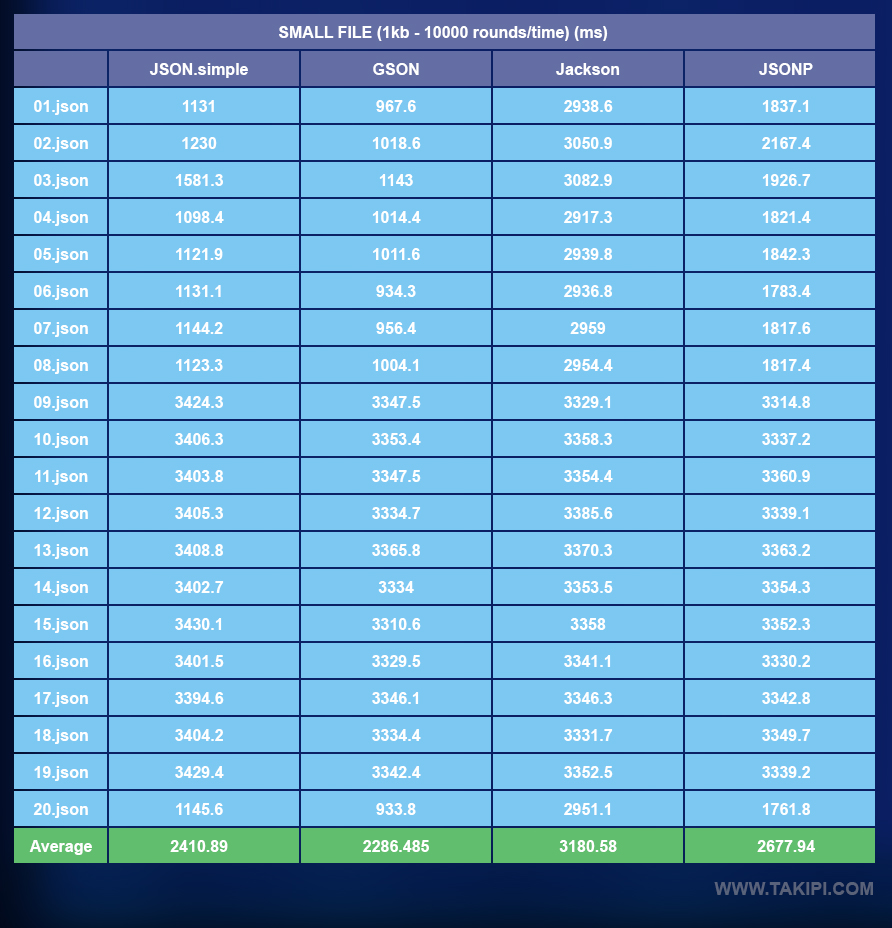
벤치마크는 190MB 짜리( https://github.com/zeMirco/sf-city-lots-json )와 1KB 짜리( http://www.json-generator.com/ ) JSON 파일을 파싱하는 속도를 측정. AWS c3.large 인스턴스에서 큰 파일은 라이브러리당 10회 씩, 작은 파일은 10,000회 씩 수행한 결과를 정리했다고 함.

큰 파일 파싱
대용량 파일 처리 결과

이미지 출처 http://blog.takipi.com

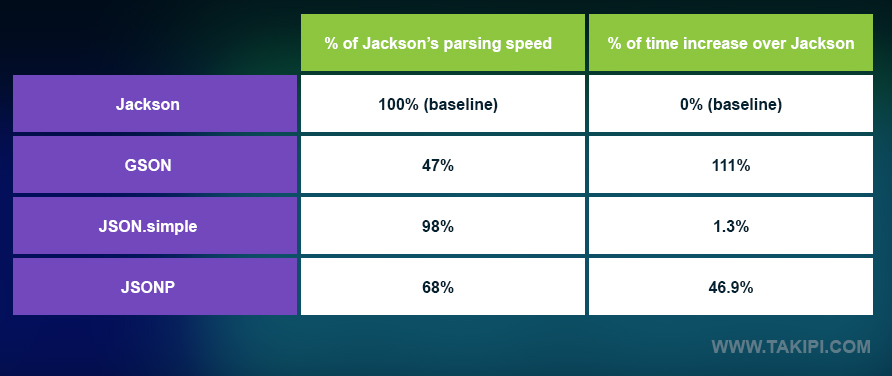
큰 파일 파싱에는 Jackson과 Json.simple 이 빠르고 Jsonp와 gson이 상대적으로 느린걸로...

가장 빠른 Jakson 성능을 기준으로 나타낸 상대 수치.
Jackson 기준 상대 속도

이미지 출처 http://blog.takipi.com


작은 파일 파싱
작은 파일 파싱

이미지 출처 http://blog.takipi.com

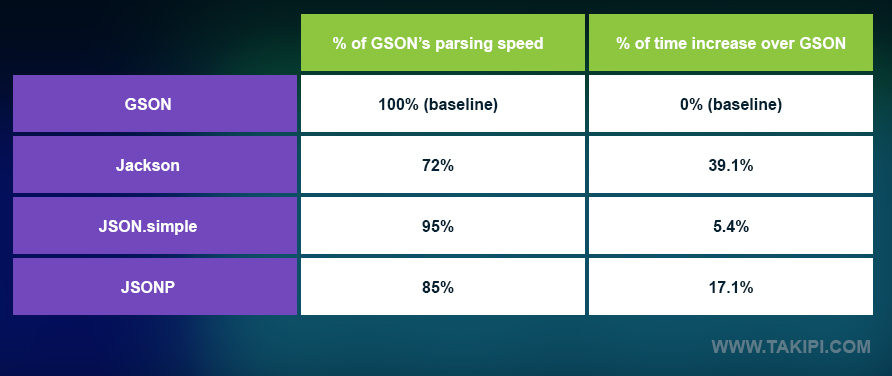
큰 파일 때와는 다른 양상을 보임. 작은 파일일때는 정도의 차이는 있지만 모든 라이브러리들이 측정 때마다 들쑥날쑥한 결과를 보임.  GSON 이 1순위를 가장많이 나타내고 있고 Json.simple 은 1순위가 한번도 없음.

가장 빠른 GSON 성능을 기준으로 나타낸 상대 수치.
Gson 기준 상대 비교

이미지 출처 http://blog.takipi.com


결론.
  • 당신의 개발 환경이 빅데이터처리와 같이 주로 큰사이즈의 JSON을 처리해야한다면 Jackson 을 써라. 대용량 환경에서 GSON은 좋지않은 선택임.
  • 마이크로 서비스와 분산아키텍처 설정등과 같이 작은 용량의 많은 json 파일을 처리하는 환경이라면 GSON을 써라.
  • 대용량과 소용량 모두를 다양하게 처리하는 환경이라면 양쪽에서 2순위 정도를 기록한 JSON.simple 이 좋을수도 있겠다.
2015/10/20 10:19 2015/10/20 10:19
Trackback Address:이 글에는 트랙백을 보낼 수 없습니다

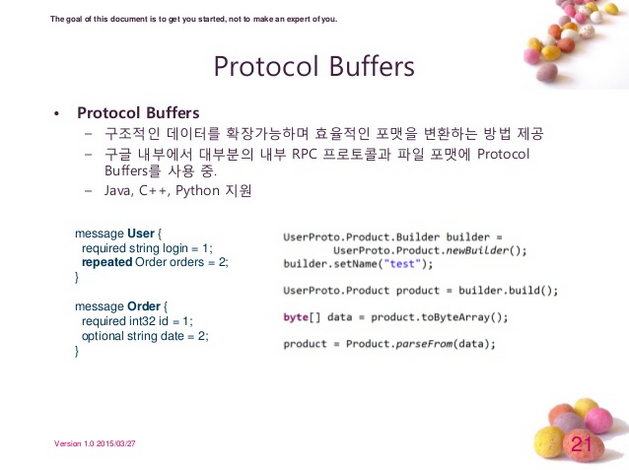
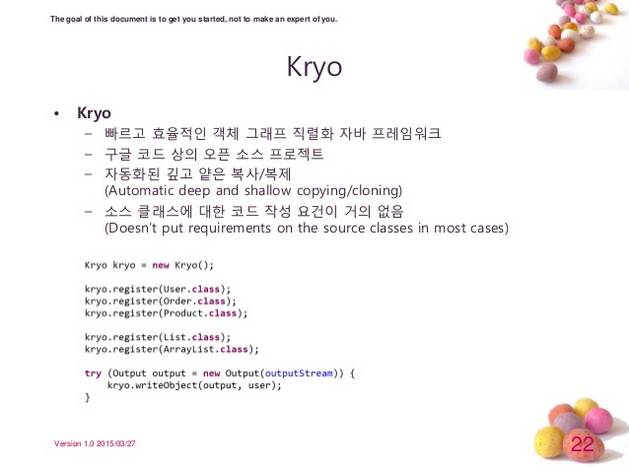
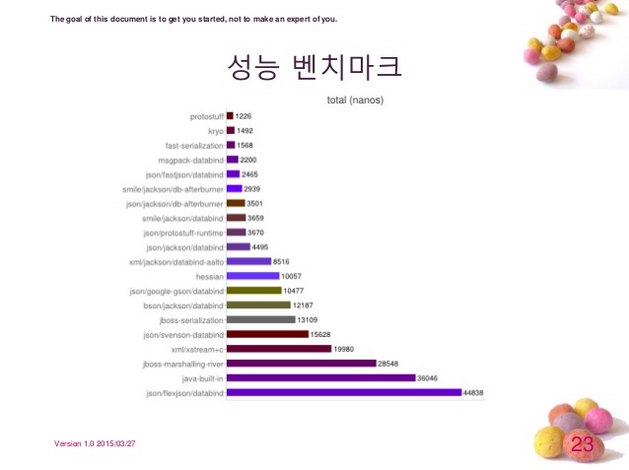
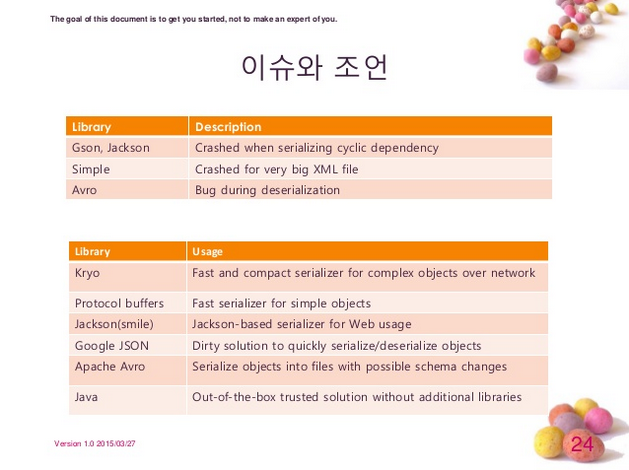
java 객체 직렬화

자바 객체 캐싱에 적용하기위한 자바 객체 직렬화 관련 자료를 찾던 중 괜찮은 자료 발견.
구글의 protocol buffers 명성은 익히 들어 알고 있었는데.. kryo 라는 녀석도 있네.. 
속도도 빠른데 복잡한 객체 직렬화에도 어울린다니 한번 검토해 볼만한 듯.

출처는 http://www.slideshare.net/sunnykwak90/java-serialization-46382579

사용자 삽입 이미지
사용자 삽입 이미지
사용자 삽입 이미지
사용자 삽입 이미지


2015/09/18 09:42 2015/09/18 09:42
Trackback Address:이 글에는 트랙백을 보낼 수 없습니다

Java Mail 첨부파일 처리

옛날 sun의 메일 관련 기술 문서인데 썬이 사라지면서 함께 사라졌던 문서. 우연히 인터넷에서 찾게되어 기록용으로 남겨둠.

ADVANCED HTML EMAIL

The April 26, 2004 Tech Tip titled Using the JavaMail API to Send HTML Email, showed how to use the JavaMail API to send HTML email that is also readable by text browsers. But the email from that tip was text only -- it didn't include images. In the following tip, you'll see how to use the JavaMail API to send HTML email that contains embedded images.


Email Image Links Considered Harmful

You might sometimes receive HTML email that includes images. Sometimes the message's HTML code links to the image on the sender's server using an <img> tag, and a src attribute that identifies the image's URL, like this:

   <img src="http://originating_server/images/image.jpg" />

The browser accesses these images just as if it were displaying an image in a Web page. Unfortunately, unscrupulous spammers have used this mechanism as a sneaky way to record who visits their site. They do this by including a unique id in the image src URL, and then saving the ID along with your email address. Such an image URL might look like this:

   <img src="http://evilspammer.com/images/x.jpg?userid=12" />

When you visit the site, the server looks up your email address by the ID, and singles you out for special treatment. Unknowingly, you've just told a spammer that you're considering their product, so they may choose to market to you more aggressively. Worse, you've told them that your email address is "live", so it can be sold at a higher price to yet other spammers.

To protect your privacy, many Web-based (and other) email clients don't display images in HTML emails. While blocking image URLs in emails protects your privacy as a user, it can complicate your life as an application developer. Fortunately, you have another option: embedded images.


Embedding Images in HTML Emails

An alternative to placing absolute URLs to images in your HTML is to include the images as attachments to the email. You then use relative URLs to those images in your HTML code. The email format for attachments is defined by MIME (Multipurpose Internet Email Extensions), the standard protocol specifications for Internet email.

MIME has a mechanism that can be used to send an email containing HTML, plus attachments that contain the images the HTML references. A specification called RFC 2387 defines the MIME content type "multipart/related". A message in multipart/related format contains a collection of objects that are meant to be used together. For the purposes of this tip, that means an HTML file and the images it uses.

Each attachment in a multipart/related message has a unique identifier called its content-id. The content-id is defined by the application that sends the email, and is assigned when the message is constructed. The HTML can reference the image in an attachment by using the protocol prefix cid: plus the content-id of the attachment. For example, if an attachment has content-idimage.part.1@x.org, then an HTML file in the same message could use the image inline with the following tag:

  <img src="cid:image.part.1@x.org" />

A mail reading program (either a standalone program, or a web-based email interface) would render the tag above using the image with the given content-id.


Providing a Text Alternative

As described in the April 2004 tip, you can use a multipart/alternative content type to include alternative versions of the same object. In doing this, you allow the receiving program (the mail reader) to choose the most appropriate content type. The "most appropriate" content type may be defined by the capabilities of the mail reader or by user preferences.

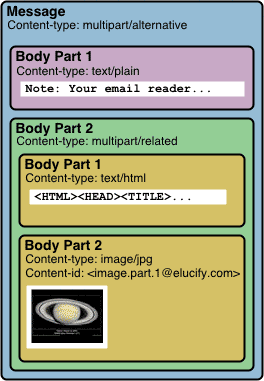
The sample code that accompanies this tip includes both a text version of the transmitted file and an HTML version with embedded images. The content-type of the message itself ismultipart/alternative. The message's first body part is the text alternative. The second body part is the HTML alternative. Images are included in the second part (the HTML) by defining the second part's content-type as multipart/related. The first related body part is the HTML code (text/html), and subsequent body parts are attachments containing any images (image/jpg) used by the first (HTML) related body part.

Here is a diagram of the multipart message sent by the sample code.
사용자 삽입 이미지


JavaMail Sample Code

The class that sends the email, HtmlEmailer.java, uses the JavaMail API to send an email with the structure defined above. The program takes a single argument: the name of a properties file that configures the program's behavior. The first section of the code loads the properties file and uses its values to create and initialize a new MimeMessage.

       Properties props = new Properties();
       props.load(new FileInputStream(propfile));
        
       Session session = Session.getInstance(props, null);
       MimeMessage msg = new MimeMessage(session);
  
       InternetAddress from =
          new InternetAddress((String)props.get
            ("ttjun2004.from"));
    
       InternetAddress to =
          new InternetAddress((String)props.get
            ("ttjun2004.to"));
    
       msg.setFrom(from);
       msg.addRecipient(Message.RecipientType.TO, to);
       msg.setSubject((String)props.get("ttjun2004.subject"));

The next section of the code creates the multipart/alternative section of the message by constructing a MimeMultipart object. It also creates the first alternative body part from the text file name supplied in the props file.

       // Create a "related" Multipart message
       Multipart mp = new MimeMultipart("alternative");

       // Read text file, load it into a BodyPart, 
       // and add it to the message.
       String textfile = (String)props.get("ttjun2004.txtfile");
       BodyPart alt_bp1 = getFileBodyPart(textfile);
       mp.addBodyPart(alt_bp1);

Method getFileBodyPart is simply a convenience method for creating body parts to use as file attachments:

   public BodyPart getFileBodyPart(String filename)
      throws javax.mail.MessagingException {
         BodyPart bp = new MimeBodyPart();
         bp.setDataHandler(new DataHandler
            (new FileDataSource(filename)));
         return bp;
   }

The DataHandler loads the file. The JavaMail classes identify and correctly set the file's Content-type header.

Returning to the class's sendmail method, the next several lines of code create amultipart/related Multipart container, and load it with its first body part: the HTML file contents.

     // Include an HTML version with images. The HTML file
     // is a Multipart of type "related". Inside it are
     // two BodyParts: the HTML file and an image
     String htmlfile = (String)props.get("ttjun2004.htmlfile");
     Multipart html_mp = new MimeMultipart("related");

     // Get the HTML file
     BodyPart rel_bph = getFileBodyPart(htmlfile);
     html_mp.addBodyPart(rel_bph);

The next task is to get the image file. The simple example program allows only a single image file, but more files would be easy to add. The properties file contains the name of the image file to attach, and also defines the content-id. The content-id must match the content-id used by the HTML file. The HTML file can use the same content-id multiple times, but the content-id should be globally unique: no two content-ids should ever be the same.

The code below creates a new MimeBodyPart for the image, and loads it with a FileDataSourcethat acquires the image file contents. The code then initializes several of the image properties. It then adds the image as the second related part of the HTML alternative.

     // Get the image file
     String imagefile = (String)props.get("ttjun2004.imagefile");
     String cid = (String)props.get("ttjun2004.cid");
     MimeBodyPart rel_bpi = new MimeBodyPart();
     FileDataSource ifds = new FileDataSource(imagefile);

     // Initialize and add the image file to the html body part
     rel_bpi.setFileName(ifds.getName());
     rel_bpi.setText("Image 1");
     rel_bpi.setDataHandler(new DataHandler(ifds));
     rel_bpi.setHeader("Content-ID", "<" + cid + ">");
     rel_bpi.setDisposition("inline");
     html_mp.addBodyPart(rel_bpi);

Two of the initializations above merit special attention. First, if the Content-ID header is not set, the image will not be identifiable by the HTML file. In this case, the image will not appear. By convention, the Content-ID is enclosed in angle-brackets. Also, a MIME message's content-id must be URL-encoded (using the same encoding as an HTTP GET query string). Second, the call tosetDisposition("inline") configures the image to appear inline in the HTML, rather than separately at the bottom of the message. This is necessary because some mail readers show images inline only when explicitly told to do so.

The final few lines of the sendmail method create a new MimeBodyPart to wrap theMimeMultipart that forms the second alternative in the message. This code adds the second alternative to the main message body, adds the main message body to the Message object, and then uses the JavaMail Transport class to send the message.

     // Create the second BodyPart of the multipart/alternative,
     // set its content to the html multipart, and add the
     // second bodypart to the main multipart.
     BodyPart alt_bp2 = new MimeBodyPart();
     alt_bp2.setContent(html_mp);
     mp.addBodyPart(alt_bp2);

     // Set the content for the message and transmit
     msg.setContent(mp);
     Transport.send(msg);

The default content (text file, html file, and image) simulates a newsletter that provides a "Space Image of the Day". In this case, the "Space Image of the Day" is a picture of the planet Saturn, accompanied by some text describing the picture. Experiment with this class by defining your own HTML content, and linking and attaching images. Don't forget to change the parameters in the properties file to reflect your changes.


2015/09/10 15:22 2015/09/10 15:22
Trackback Address:이 글에는 트랙백을 보낼 수 없습니다

java 어플리케이션을 windows service 로 등록

http://forge.ow2.org/ 의 JavaService.exe 를 활용한 윈도우즈 서비스로 등록.

tip. -current 옵션으로 어플리케이션 위치 정보를 전달 해야 함.
[code]@echo off
rem *******************************************************
rem * 아래 내용은 사용자 환경에 맞추어 설정하여야 한다.
rem * JAVA_HOME : java설치된 경로
rem * JAVA_SERVICE : JavaService.exe 실행 파일위치
rem * SERVICE_NAME : 서비스 이름
rem * AGENT_PATH : Java 프로그램 경로
rem *******************************************************
set AGENT_PATH=C:/usbbackup
set SERVICE_NAME="USB_Backup"
set JAVA_HOME=%AGENT_PATH%/jre
set JAVA_SERVICE=%AGENT_PATH%/JavaService.exe
set CLASSPATH=%JAVA_HOME%/lib/rt.jar
set CLASSPATH=%AGENT_PATH%/lib/h2-1.3.176.jar
set CLASSPATH=%AGENT_PATH%/lib/log4j-1.2.17.jar;%CLASSPATH%
set CLASSPATH=%AGENT_PATH%/lib/slf4j-api-1.7.12.jar;%CLASSPATH%
set CLASSPATH=%AGENT_PATH%/lib/slf4j-log4j12-1.7.12.jar;%CLASSPATH%
set CLASSPATH=%AGENT_PATH%/USBCopy-1.0.jar;%CLASSPATH%
set CLASSPATH=%AGENT_PATH%/conf;%CLASSPATH%
set CLASSPATH=%AGENT_PATH%/log;%CLASSPATH%

rem *******************************************************
rem * 아래 내용은 수정 하지 마시오.
rem *******************************************************
%JAVA_SERVICE% -install %SERVICE_NAME% %JAVA_HOME%/bin/server/jvm.dll -Djava.class.path=%CLASSPATH% -Xmx32M -start com.usbcopy.AppMain -out %AGENT_PATH%/log/javaservice_out.log -err %AGENT_PATH%/log/javaservice_err.log -current %AGENT_PATH% -description "USB 자동 백업 프로그램"
pause [/code]

[code]@echo off
rem *******************************************************
rem * 아래 내용은 사용자 환경에 맞추어 설정하여야 한다.
rem * JAVA_SERVICE : JavaService.exe 실행 파일위치
rem * SERVICE_NAME : 서비스 이름
rem ******************************************************

set JAVA_SERVICE="C:/usbbackup/JavaService.exe"
set SERVICE_NAME="USB_Backup"

%JAVA_SERVICE% -uninstall %SERVICE_NAME%
pause [/code]
2015/08/19 15:33 2015/08/19 15:33
Trackback Address:이 글에는 트랙백을 보낼 수 없습니다